Renesas
RZ/V AI

3.00

The best solution for
starting your AI applications.

Provided by Renesas Electronics Corporation

To keep you updated,
Watch our GitHub repository
Watch


This project is maintained by renesas-rz

Hosted on GitHub Pages — Theme by orderedlist

AI Applications Demo
How to Use Guide


This guide supports RZ/V2L AI SDK v2.10


Overview

This page explains how to setup the RZ/V2L Evaluation Board Kit (EVK) using the demo binary file.
Unlike the procedure described in Getting Started, this page does not build the AI Software Development Kit (AI SDK) environment, so you can easily try running the AI Applications.

In this guide, you will be able to learn followings.


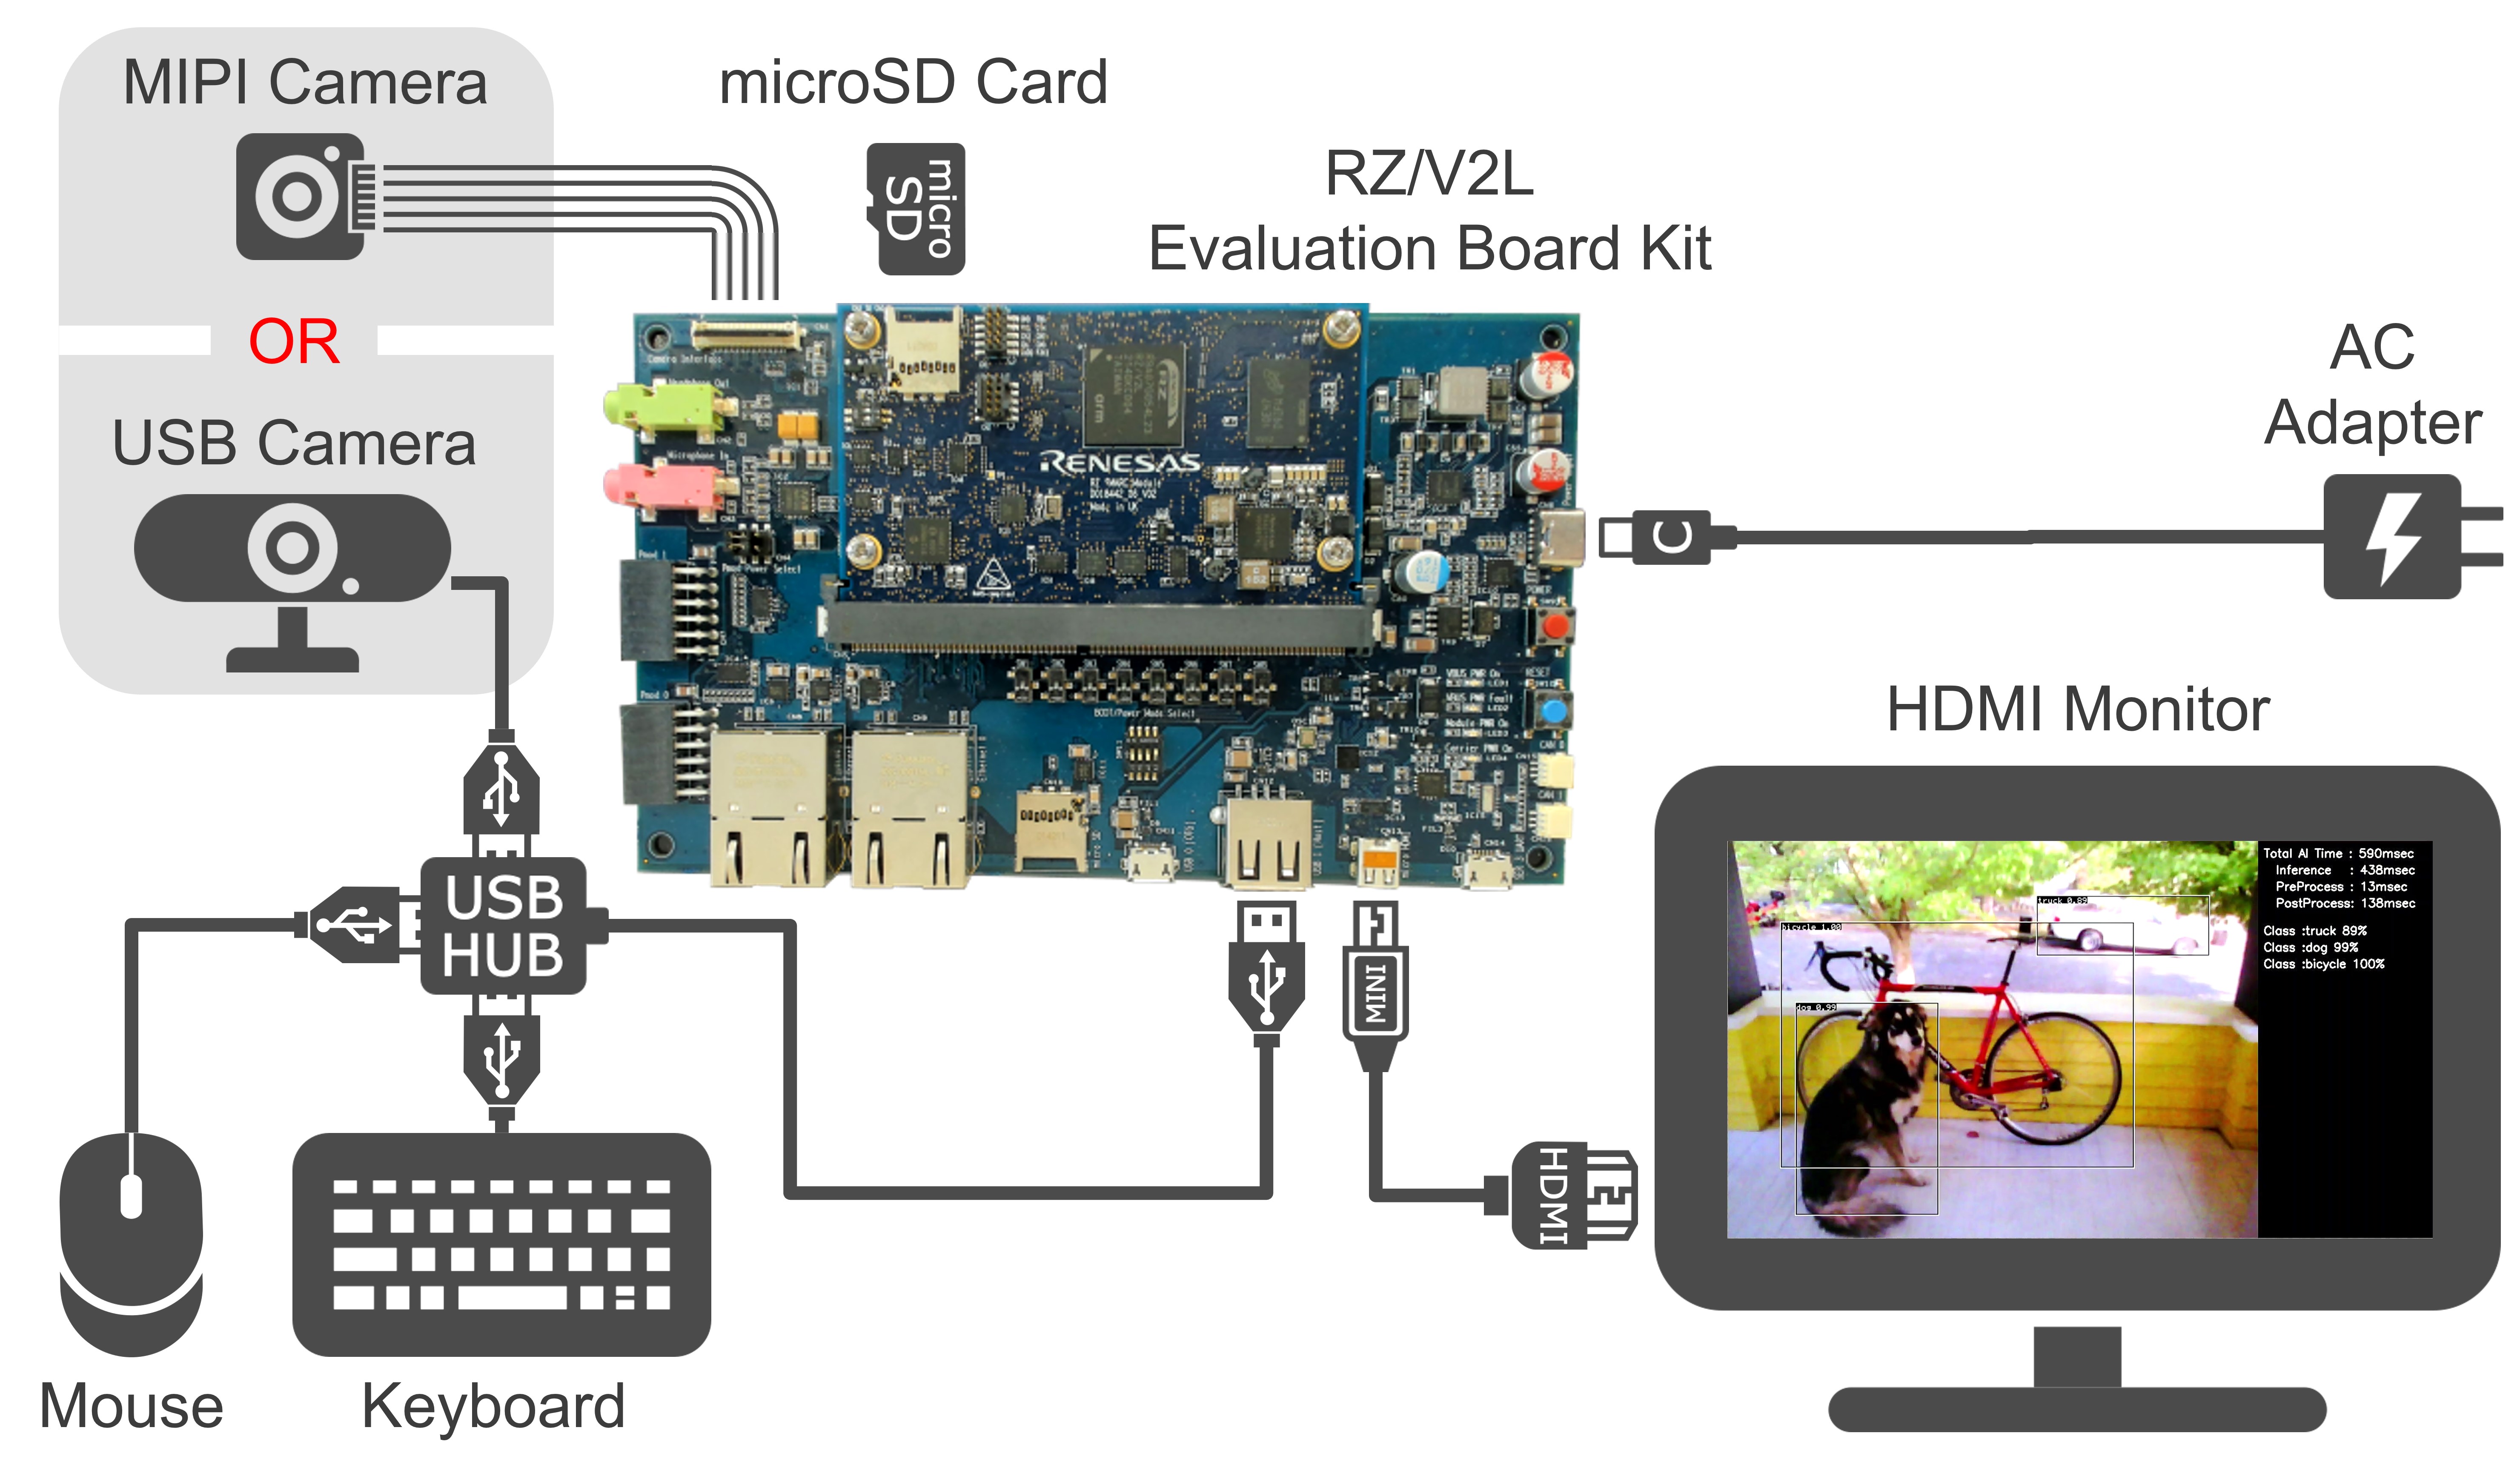
The goal of this guide is to run the application and display the captured data with AI inference results on an HDMI monitor as shown below.

demo_example

To see a list of applications included in this demo, see List of AI Applications Demo.

For more information about the RZ/V series, click here.


Preparation

This chapter describes the procedures up to the first startup of the RZ/V2L Evaluation Board Kit.

Step 1: Hardware Preparation

Refer to the guide in the link below and prepare what you need.

  1. RZ/V2L Evaluation Board Kit
    Details are shown below

  2. Other necessary equipments
    Details are shown below

    Note 1 Unlike Demo v1.00, Windows PC is no longer required.
    Note 2 Some applications support audio output in addition to the visual presentation on HDMI monitor.
    If you would like to have the audio output, please prepare the HDMI monitor with speaker.


Step 2: Demo file extraction to microSD card

  1. If you have not yet obtained the demo file, click on the link below to download it.

    Download Link

    Note In this section, we use a Linux PC to prepare the microSD card. If you want to use a Windows PC, we have experience with the following Windows applications to write a disk image.

  2. Put the downloaded Zip file into a Linux PC and unzip it using the following command in a terminal.

    unzip RTK0EF0166F02100SJ.zip
    Make sure the following folders and files are generated after unzipping the file.
    Demo File Structure
    Folder Name Folder Content Description
    licenses/ linux_licenses.zip Linux license information.
    r11an0752ej0210-rzv2l-ai-sdk(Linux License List).pdf List of Linux license information included in Demo microSD image. Copyright information is not included. Please refer to Open Source Software packages included in AI SDK v2.10 Source Code to see copyright information.
    sd_image/ ai_applications_demo_v2.10.dd.zip Zip file containing the Demo microSD image.
    r11an0762ej0210-rzv2l.pdf ReadMe document describing the contents of the Demo zip file.

  3. Run the following command to extract ai_applications_demo_v2.10.dd.zip in the sd_image folder.

    cd sd_image
    unzip ai_applications_demo_v2.10.dd.zip

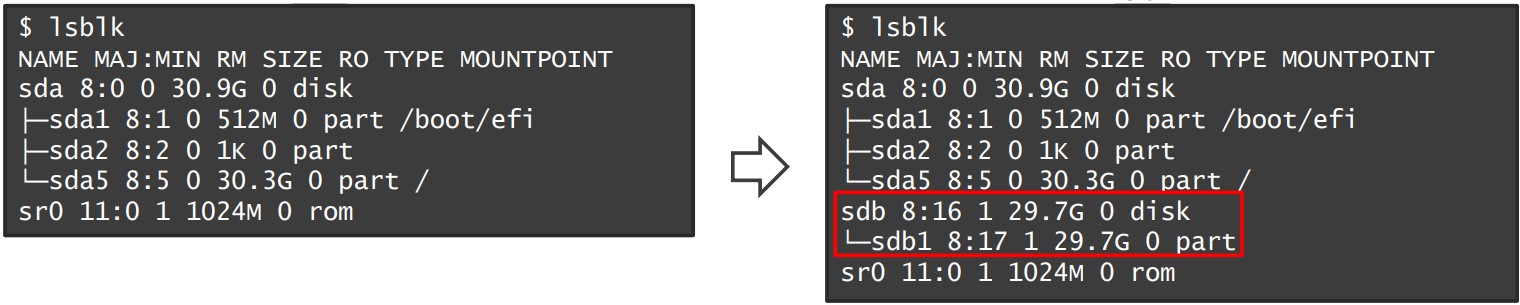
  4. Run the following command to check the device connected to the Linux PC before inserting the microSD card.

    lsblk
    Then, insert the microSD card into the Linux PC and run the same command (lsblk) again.
    Confirm that the microSD device name (/dev/sdb) has been added to the terminal after inserting the card, as shown in the console window below.

    demo_lsblk_check
    Note The microSD card device name may vary depending on the PC environment.
    In this manual, we use /dev/sdb as the microSD card device name.

  5. Using the device name found above (/dev/sdb), write the disk image file into the microSD card.

    sudo dd if=ai_applications_demo_v2.10.dd of=/dev/sdb bs=1M status=progress
    Warning Change /dev/sdb to your microSD card device name.
    Note Writing the microSD card image with the dd command takes time.
    (Depending on your environment, it takes about 30 minutes.)

  6. Execute the following command to eject the microSD card.
    sudo eject /dev/sdb
    Warning Change /dev/sdb to your microSD card device name.


This completes the board setup. Let’s move on to the next chapter and run the applications.


Running Applications

This chapter describes how to run the AI Applications in the demo file.

Step 1: Boot process

  1. Once the Preparation chapter is complete, you can boot the board in the following way.
    Boot procedures


Step 2: Demo execution

  1. The list of AI applications is shown below. Select the application you want to run from the list.
    List of AI Applications Demo
    Category Application Name Execution Script Details Supported
    Camera Devices
    User Interface
    Agriculture Defense wild animals for crop Defense-wild-animals-for-crop.sh GitHub Link MIPI / USB CUI
    Fruit and Vegetable Plant Disease Check Fruit-and-Vegetable-Plant-Disease-Check.sh GitHub Link MIPI GUI
    Ranch Livestock Management Ranch-Livestock-Management.sh GitHub Link MIPI/USB CUI
    Smart Building Elevator passengers Counting Elevator-passengers-Counting.sh GitHub Link MIPI / USB CUI
    Conference Room Usage Monitor Conference-Room-Usage-Monitor.sh GitHub Link MIPI / USB CUI
    Lighting Control Lighting-Control.sh GitHub Link MIPI / USB CUI
    Security Area Intrusion Detection Security-Area-Intrusion-Detection.sh GitHub Link MIPI / USB CUI
    Wear management at construction sites Wear-management-at-construction-sites.sh GitHub Link MIPI / USB CUI
    Touchless Controller for elevator Touchless-Controller-for-elevator.sh GitHub Link MIPI / USB CUI
    Employee ID check for Restricted Area Employee-ID-check-for-Restricted-Area.sh GitHub Link USB GUI
    Smart City Congestion Detection in Railway Station Congestion-Detection-in-Railway-Station.sh GitHub Link MIPI / USB CUI
    Prohibited Area Management Prohibited-Area-Management.sh GitHub Link MIPI / USB CUI
    Distracted driving detection Distracted-driving-detection.sh GitHub Link MIPI / USB CUI
    Parking Spot Reservation Parking-Spot-Reservation.sh GitHub Link USB GUI
    Passport check support Passport-check-support.sh GitHub Link USB GUI
    Duration monitoring for surveillance camera Duration-monitoring-for-surveillance-camera.sh GitHub Link USB CUI
    Illegal Parking Check Illegal-Parking-Check.sh GitHub Link USB GUI
    Bus passenger counting Bus-passenger-counting.sh GitHub Link MIPI / USB CUI
    Backtravel Detection Backtravel-Detection.sh GitHub Link MIPI / USB CUI
    Violence Activity Check in Surveillance Camera Violence-Activity-Check-in-Surveillance-Camera.sh GitHub Link MIPI CUI
    Bird Damage Prevention Bird-Damage-Prevention.sh GitHub Link MIPI / USB CUI
    Blind Spot Monitor Blind-Spot-Monitor.sh GitHub Link MIPI / USB CUI
    Preceding Vehicle Movement Alert Preceding-Vehicle-Movement-Alert.sh GitHub Link MIPI / USB CUI
    +Audio Output
    Emergency Vehicles Detector Emergency-Vehicles-Detector.sh GitHub Link MIPI / USB CUI
    Illegal Bicycle Approach Detection Illegal-Bicycle-Approach-Detection.sh GitHub Link MIPI / USB CUI
    Bicycle Rental Stock Management Bicycle-Rental-Stock-Management.sh GitHub Link MIPI / USB CUI
    Illegal Bicycle Parking Monitor Support Illegal-Bicycle-Parking-Monitor-Support.sh GitHub Link MIPI / USB CUI
    Infrastructure Defect Prevention Infrastructure-Defect-Prevention.sh GitHub Link MIPI / USB CUI
    Crime Prevention Support for School Crime-Prevention-Support-for-School.sh GitHub Link MIPI / USB CUI
    Healthcare Physical Condition Monitor Physical-Condition-Monitor.sh GitHub Link MIPI / USB CUI
    Smart Home Air Conditioner Control Air-Conditioner-Control.sh GitHub Link MIPI / USB CUI
    Pet Detection in Kitchen and Child's Room Pet-Detection-in-Kitchen-and-Childs-Room.sh GitHub Link MIPI / USB CUI
    Touchless Controller for Kitchen Appliance Touchless-Controller-for-Kitchen-Appliance.sh GitHub Link MIPI / USB CUI
    Smart TV - Not included in
    Demo v2.10
    - -
    Food Package Expiry Date Check Food-Package-Expiry-Date-Check.sh GitHub Link MIPI / USB CUI
    Industrial Work Area Personnel Management Work-Area-Personnel-Management.sh GitHub Link MIPI / USB CUI
    Helmet and safety vest wearing monitor Helmet-and-safety-vest-wearing-monitor.sh GitHub Link MIPI / USB CUI
    Touchless Controller for Industrial machine Touchless-controller-for-Industrial-machine.sh GitHub Link MIPI / USB CUI
    Access Control Access-Control.sh GitHub Link MIPI / USB CUI
    Driver Monitoring System Driver-Monitoring-System.sh GitHub Link MIPI / USB CUI
    Species check support in Fish Factory Species-check-support-in-Fish-Factory.sh GitHub Link MIPI CUI
    Defect Inspection Support Defect-Inspection-Support.sh GitHub Link MIPI / USB CUI
    Aquaculture Industrial Support Aquaculture-Industrial-Support.sh GitHub Link MIPI / USB CUI
    Retail Congestion Detection Congestion-Detection.sh GitHub Link MIPI / USB CUI
    Staying and flow line monitoring Staying-and-flow-line-monitoring.sh GitHub Link USB CUI
    Smart POS Smart-POS.sh GitHub Link MIPI / USB CUI
    Marketing Interest Analysis Marketing-Interest-Analysis.sh GitHub Link MIPI / USB CUI
    Exhibition Participants Monitoring Exhibition-Participants-Monitoring.sh GitHub Link MIPI / USB CUI
    Store Crime Prevention Store-Crime-Prevention.sh GitHub Link MIPI / USB CUI

  2. After following the boot procedure in the previous section, you should be able to enter commands into the terminal screen on the HDMI monitor.
    Execute the following commands. Replace <category> and <application-name> with the selected application.
    cd /home/root
    ./<category>/<application-name>.sh
    Example:
    To run "Elevator passengers Counting" application, write following command.
    ./SmartBuilding/Elevator-passengers-Counting.sh
    Note Some applications support both MIPI/USB camera input. (Refer to List of AI Applications Demo). To use USB camera for those applications, run following command.
    ./<category>/<application-name>.sh USB

  3. On monitor, the application will automatically start.
    Note 1 Some applications require GUI control. See the link in the user interface column of List of AI Applications Demo.
    Note 2 Applications with Audio Output provide the sound alert from HDMI monitor speaker in addition to the visual presentation.
    E.g. Preceding Vehicle Movement Alert.

  4. To terminate the application, press Super (Windows key) + Tab keys to switch back to terminal window and press Enter key.
    If the application does not terminate, press Ctrl + C keys on the terminal window.


Step 3: Shutdown process

  1. Follow these steps to power down the board.
    Shutdown Procedures


Tips

Linux terminal has the auto-completion functionality.