Renesas
RZ/V AI
The best solution for
starting your AI applications.
Provided by Renesas Electronics Corporation


To keep you updated,
Watch our GitHub repository
Watch
This project is maintained by renesas-rz
Hosted on GitHub Pages — Theme by orderedlist
~ How to develop and run RZ/V AI applications on e2 studio ~
This page explains how to develop and run RZ/V AI applications using a GUI environment.
For this GUI environment, Renesas provides AI Navigator, which is a set of plugins for the Renesas IDE e2 studio and supports your application development.
Please read the AI Navigator Release Note first. This document describes the changes, restrictions, and some notes.
| Target version | AI Navigator V1.1.0 |
|---|---|
| Supported environment | Ubuntu 20.04 LTS, Renesas e2 studio 2024-04 (or later) for Linux |
| Supported Devices | RZ/V2L, RZ/V2H |
| Supported Board |
(RZ/V2L) RZ/V2L Evaluation Board Kit (RZ/V2H) RZ/V2H Evaluation Board Kit |
| Supported Functions of AI Applications |
(RZ/V2L) Q01-Q11 in RZ/V AI SDK V2.10 (RZ/V2H) Q01, Q08, 01, 02, 07, 11 in RZ/V AI SDK V3.00 |
(Link)
Introduction
AI Navigator is a set of plugins for e2 studio that makes it easy to run AI applications on Renesas devices.
By using AI Navigator, you can try out Renesas AI application from importing to running on the board with just a few clicks.
In addition, AI Navigator includes some plugins for transfer learning tool (RZ/V AI Transfer Learning Tool) and AI model conversion tool (DRP-AI TVM). That’s why you can also develop your AI embedded systems with AI Navigator, such as training and converting AI models and building application source codes on e2 studio.
The development steps for RZ/V AI applications are shown below. All steps can be controlled by the AI Navigator.
The tools “RZ/V AI Transfer Learning Tool” and “DRP-AI TVM” are called by AI Transfer Learning Tool Plugin and AI Model Conversion Tool Plugin, respectively.

Please follow the steps below to start developing your AI applications with AI Navigator. Note that you can skip some steps depending on your use case.
Preparation
Before you start using the AI Navigator, prepare the necessary equipment and software as described in Step 1 and Step 2 in Getting Started.
To install Docker, see "1. Set up Docker's apt repository" and "2. Install the Docker packages" on the following Docker web page.
Install using the apt repository in Docker docs
In addition, some plugins in AI Navigator run Docker as a non-root user. See "Manage Docker as a non-root user" in the following Docker web page to run as a non-root user.
Manage Docker as a non-root user in Docker docs
Step 1: AI Navigator Installation
Non-users of e2 studio
Download e2 studio Linux Host from the Renesas website.
- Device Families: Linux on Renesas RZ
- Additional Software: Renesas AI Navigator, AI Transfer Learning Tool Plugin, AI Model Conversion Tool Plugin
Users of e2 studio
Add the necessary plugins by following the steps below.- Launch e2 studio.
- Click [Help] > [Install Renesas IDE Features...].
- Select [Renesas AI Navigator], [AI Transfer Learning Tool Plugin], [AI Model Conversion Tool Plugin] and click [Finish].
- Confirm that these plugins are selected in the "install" dialog box and click [Next].
- Confirm these plugins are selected as the installation target and click [Next].
- Read the license agreements and select "I accept the terms of the license agreement" if you agree. Then, click [Finish] to start the plugins installation.
- If the dialog of the trust certificate dialog appears during the installation, check the certificate and click [OK].
- After the installation is finished, e2 studio will prompt you to restart. Click [Restart Now].
Get e2 studio
Select the following each item when installing.
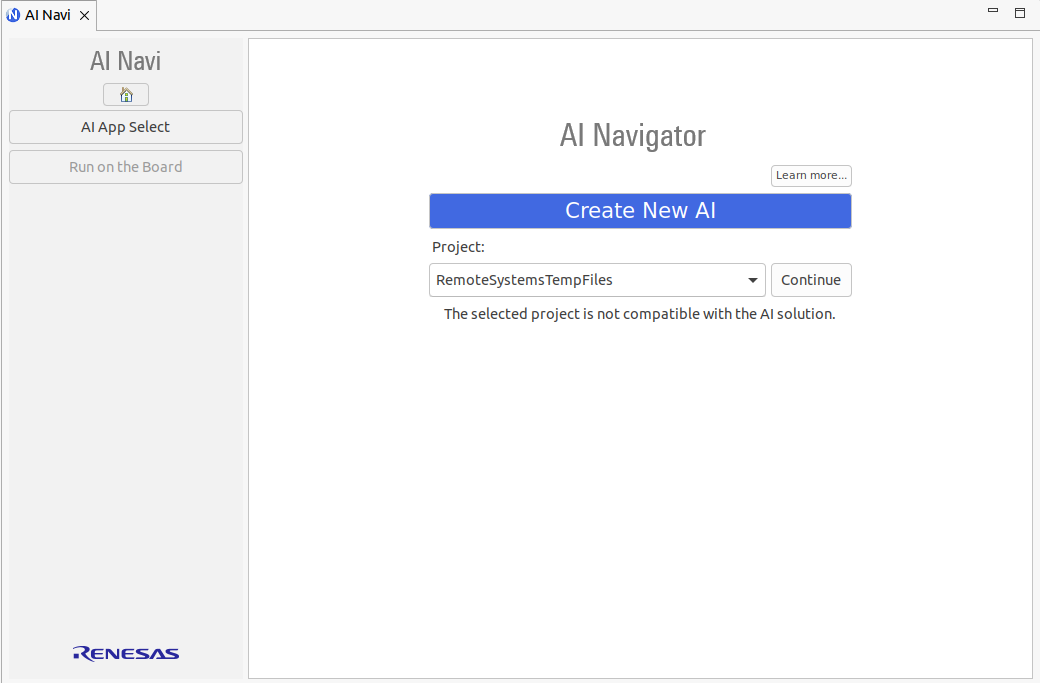
Step 2: Start AI Navigator
Step 3: Import AI Applications Project
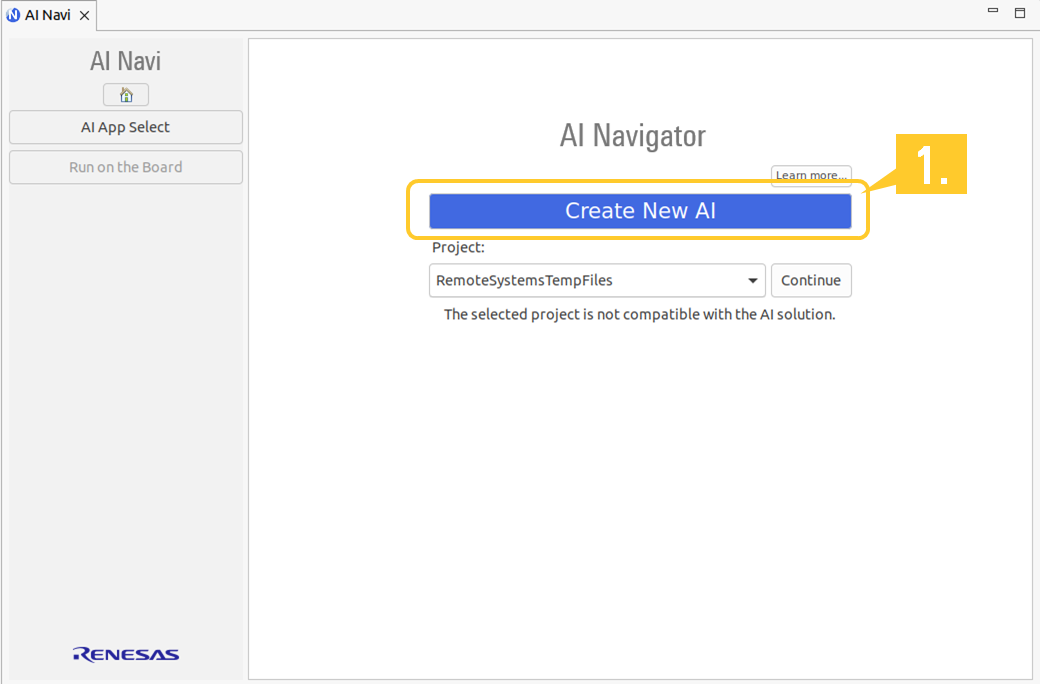
Import an AI application project from Renesas AI server by the following steps.
1. Click [Create New AI] in the start view.
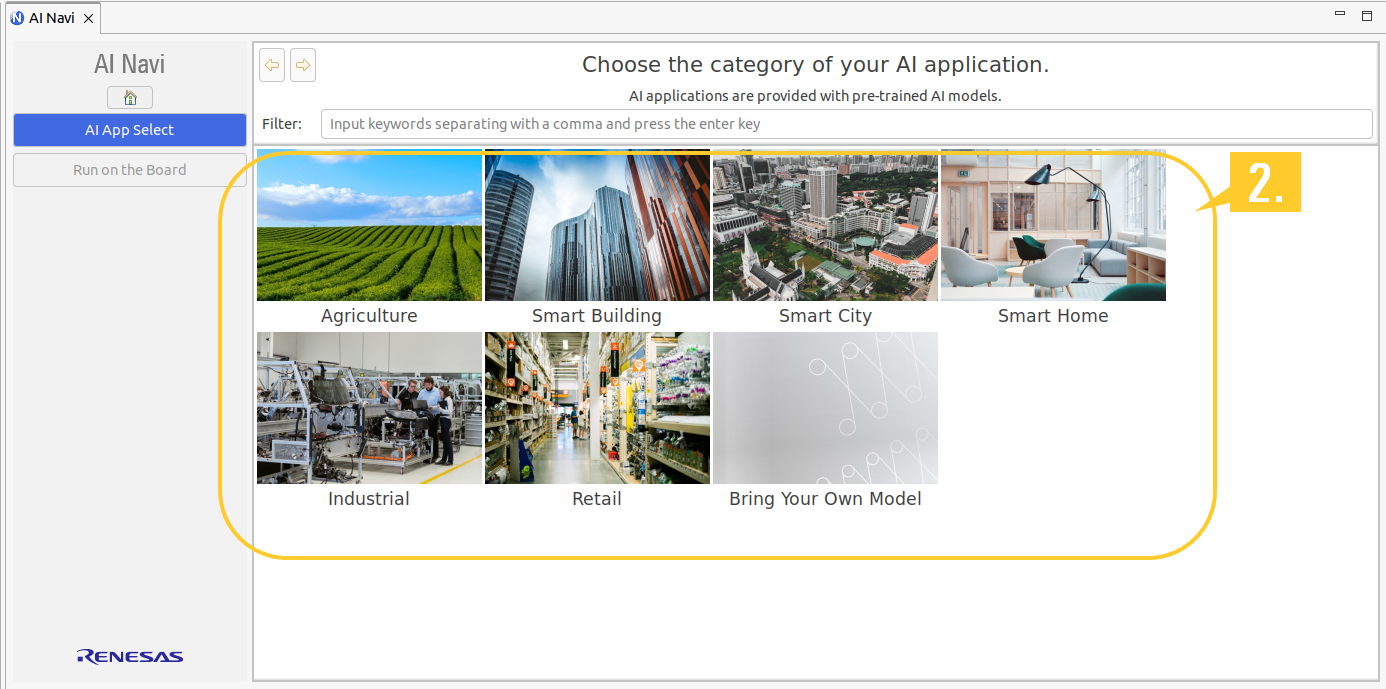
2. Select a category of AI application based on your case. You can search the proper category if you enter keywords in Filter.
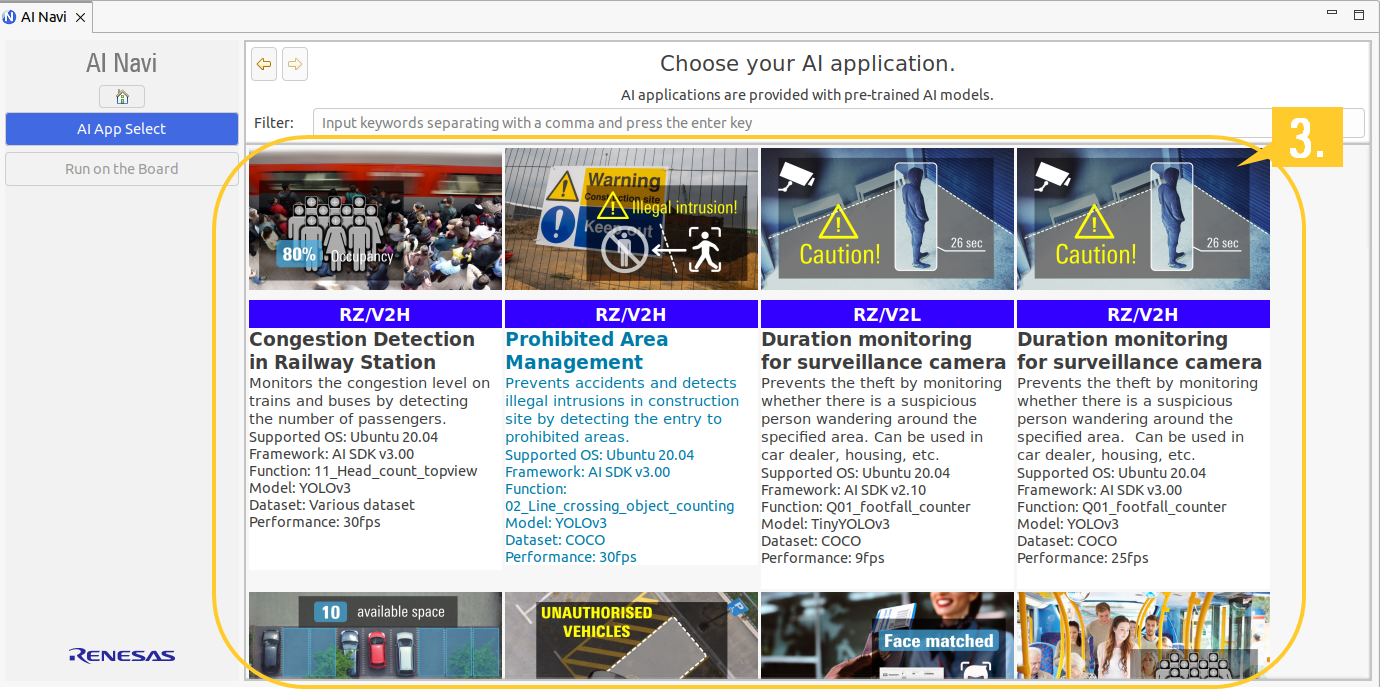
3. Select an AI application.
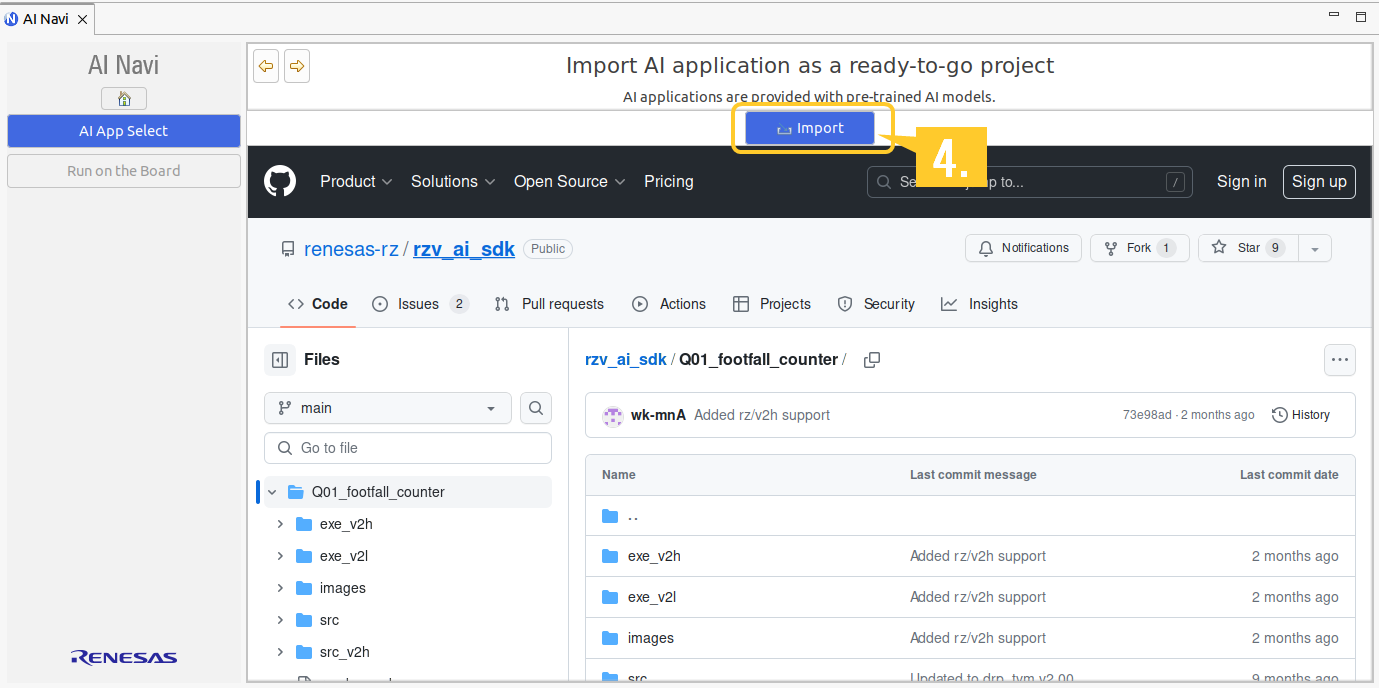
5. The Project and AI information view will appear if the import is successful.
From this view, you should specify the location of the downloaded and extracted RZ/V AI SDK directory.If you haven't downloaded the RZ/V AI SDK, which is the environment for the imported AI application, click [Download...] to download and extract it. And then, specify the directory path.
If you've already downloaded and extracted the RZ/V AI SDK, click [Set the download folder...] and specify the directory.
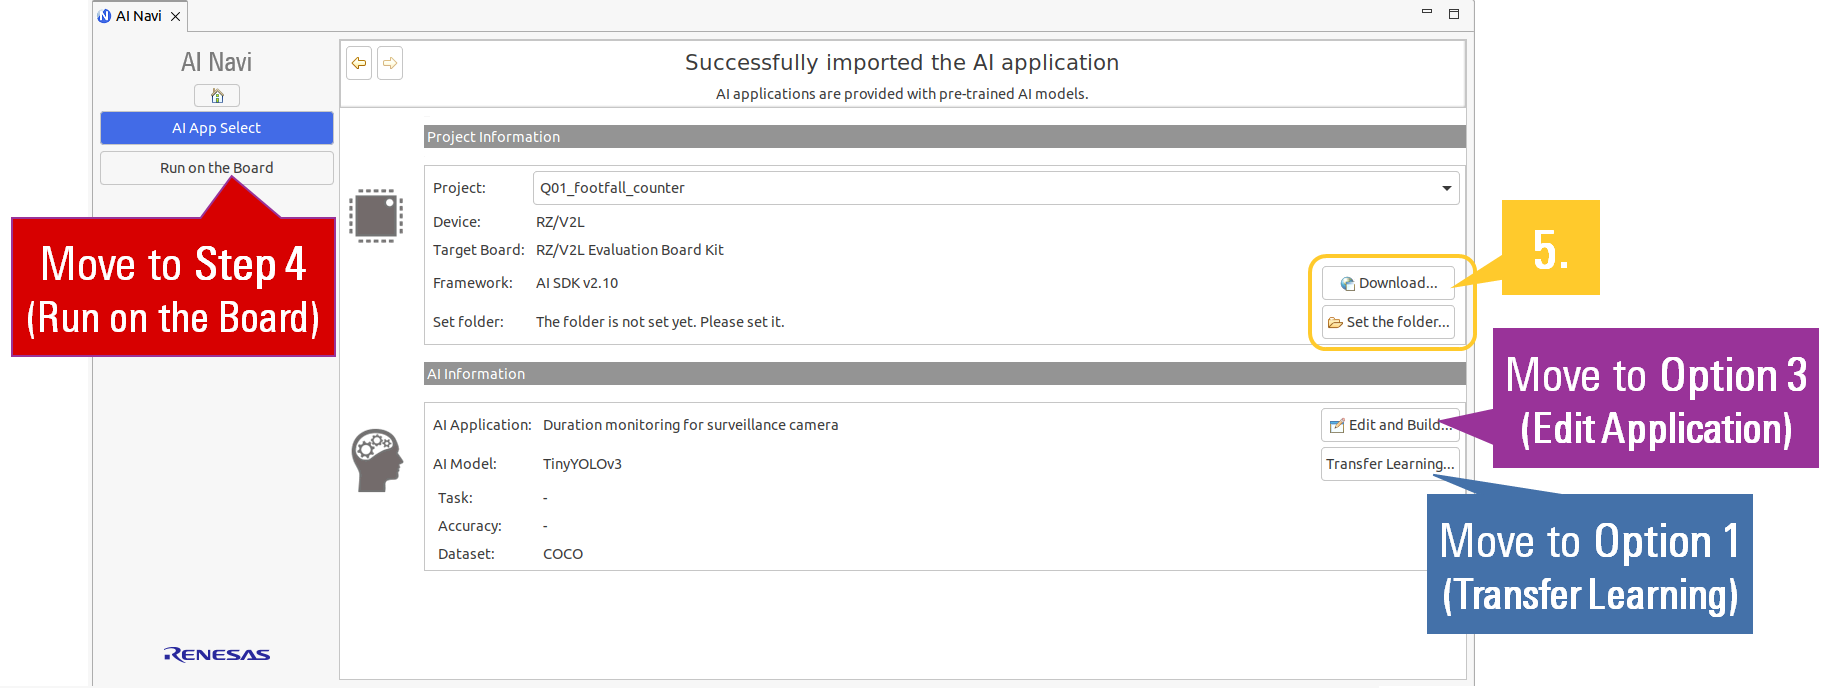
That’s it for the steps to import an AI application project.
Please proceed to each step according to your requirements.
- For the users who just want to run an AI application: go to Step 4: Run on the Board
- For the users who want to customize AI models: go to Option 1: Train AI model -> Option 2: Convert AI model -> Option3: Edit Application -> Step 4: Run on the Board
- For the users who want to use AI models without any changes, but want to edit AI application source code: go to Option3: Edit Application -> Step 4: Run on the Board
When you click a button again, the option guides close and the button returns to its default color.
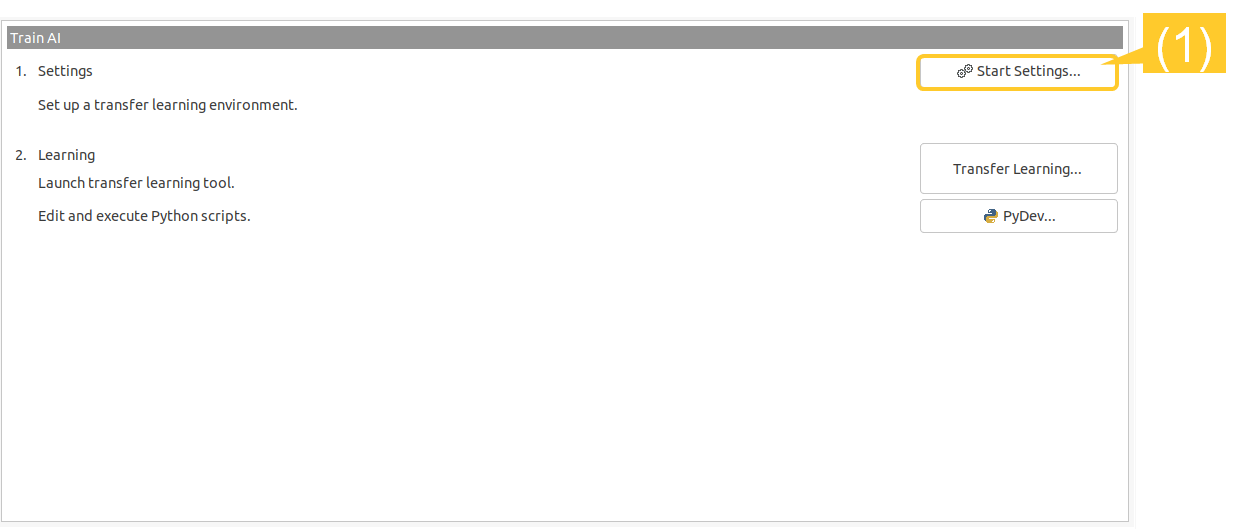
Option1: Train AI Model
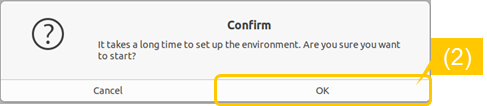
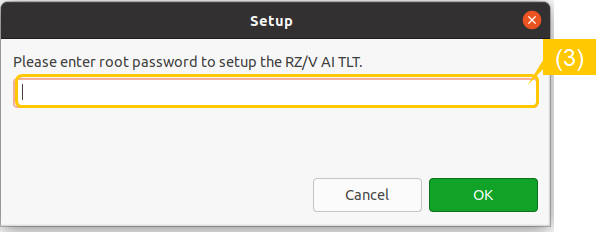
For RZ/V, you can train any AI models provided in any Renesas AI application using the RZ/V AI Transfer Learning Tool (hereinafter referred to as RZ/V AI TLT).1. Configure the environment for the transfer learning tool
At this time, the download page for RZ/V AI Transfer Learning Tool on the Renesas website will open automatically. Read the "SOFTWARE LICENSE AGREEMENT" and click "Accept and download" if you agree.
After the download is completed, select the downloaded file.
(4) When the setup process is complete, the installation window will close automatically.
At this point, please confirm the console on e2 studio and logged as below. If it is the same, the setup process has completed successfully.
Finished at exit code 0
Please confirm the console log.(e.g.) If e2 studio is installed in ~/.local/share/renesas/e2_studio, RZ/V AI TLT is installed in ~/.local/share/renesas/rzv_ai_tlt.
In addition, RZ/V AI TLT provides this user's manual (r21ut0254ej0210-rzv-ai-tlt.pdf), which is stored in rzv_ai_tlt/2.10/docs.
2. Launch the transfer learning tool

After finishing the transfer learning, you need to convert the trained AI model with DRP-AI TVM to run it on the target board.
Click the above button on this page [Option2: Convert AI Model] and see the procedures.
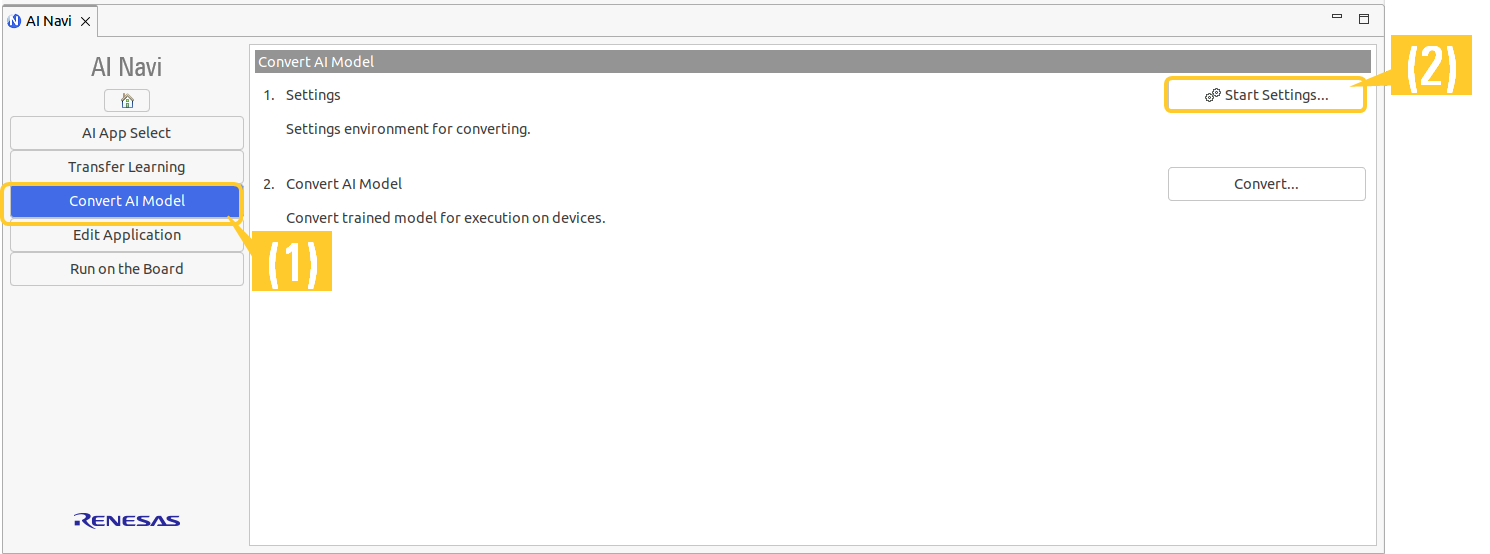
Option2: Convert AI Model
After training an AI model, convert an AI model to generate an executable runtime on the target device. For RZ/V, DRP-AI TVM is used, which is a machine learning compiler plugin for Apache TVM with AI accelerator DRP-AI.AI Model Conversion Tool Plugin (hereafter referred to as "TVM Plugin") is a plugin for DRP-AI TVM and enables it to run on e2 studio.
For DRP-AI TVM, please refer to the following website and GitHub page.
This section briefly describes the steps in the AI model conversion procedure usingy DRP-AI TVM on e2 studio.
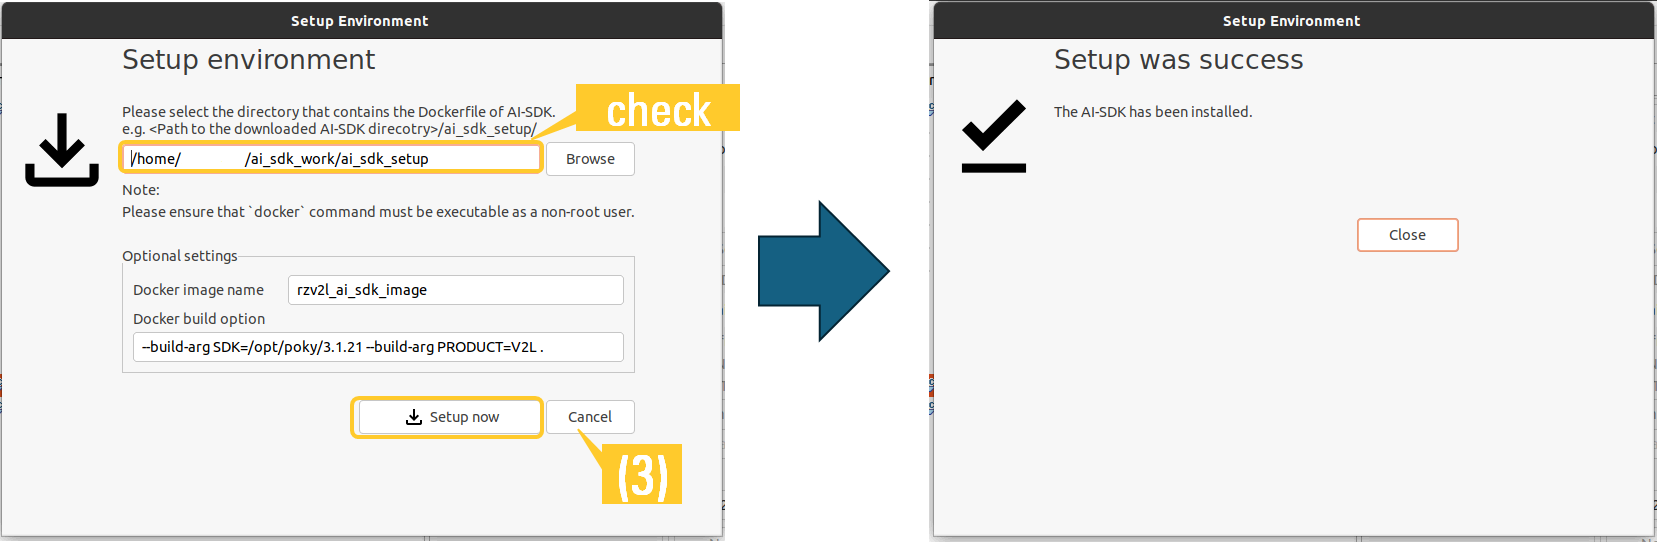
1. Configure the environment for DRP-AI TVM on e2 studio
(2) Click [Start Settings...] and open the DRP-AI TVM.
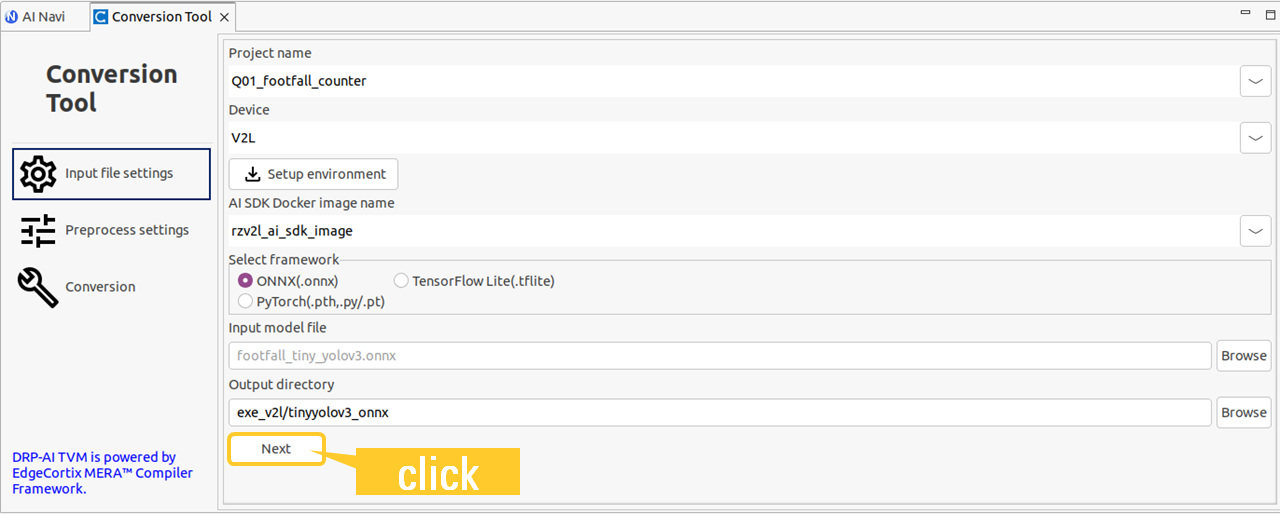
2. Input File Setting
- Project name Select your target AI application project.
- Device Select your target device.
- AI SDK Docker image name Select the RZ/V AI SDK that you have set up to convert your AI model.
- Select framework f Select an AI framework that the input AI model file uses.
- Input model file The file path of your AI model is automatically set by RZ/V AI TLT. It is not necessary to specify this field.
- Output directory Specify the output directory after conversion.
If you have already set up the DRP-AI TVM environment for your application, you do not need to click this button.
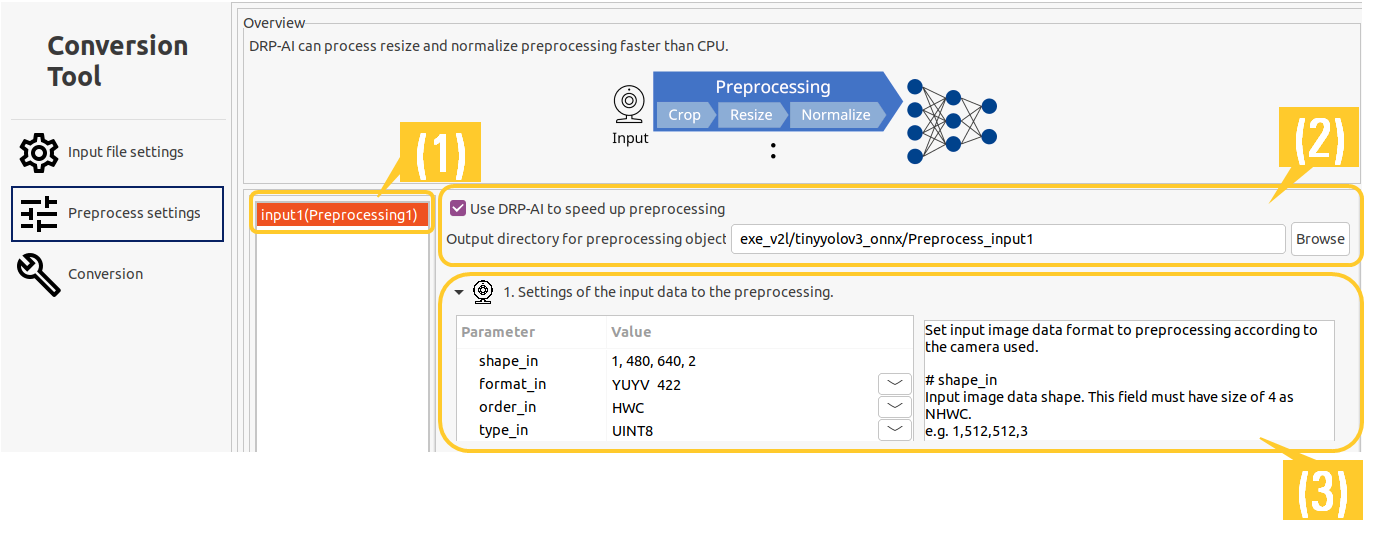
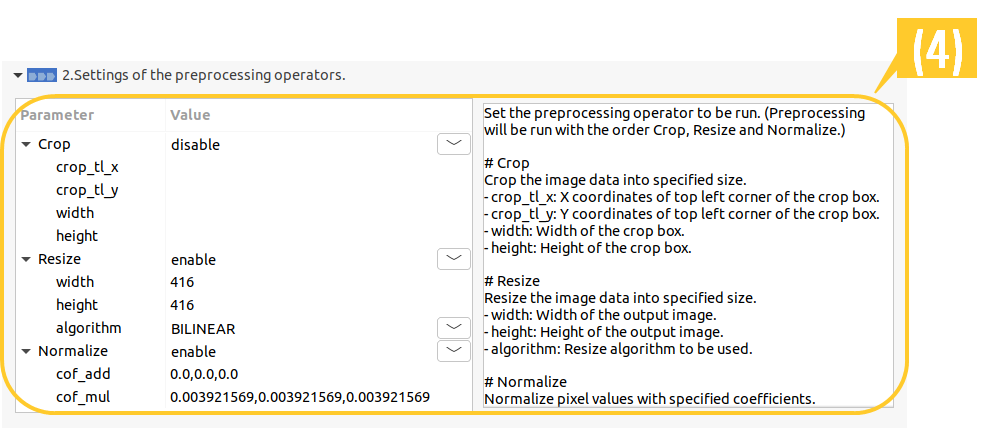
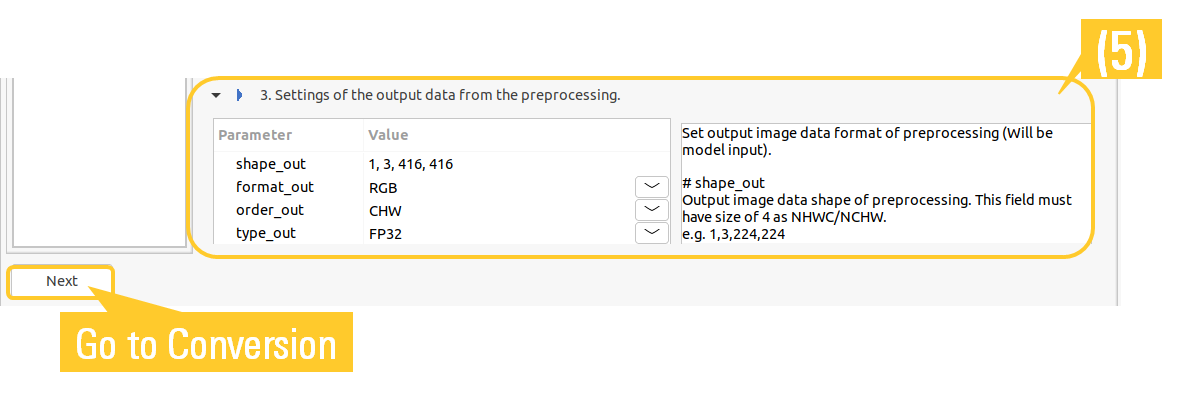
3. Preprocess Setting
However, if you want to use another input, such as using another camera, etc, configure the preprocessing parameters by following the steps below.
(1) Select the target input node.
(2) Confirm the "Preprocessing output directory" and change it if necessary.
By default, "Use DRP-AI to speed up preprocessing" is checked. If you want to skip preprocessing, clear the check box and click [Next] to go to the next step AI model conversion.
(3) Set the input data parameters for preprocessing.
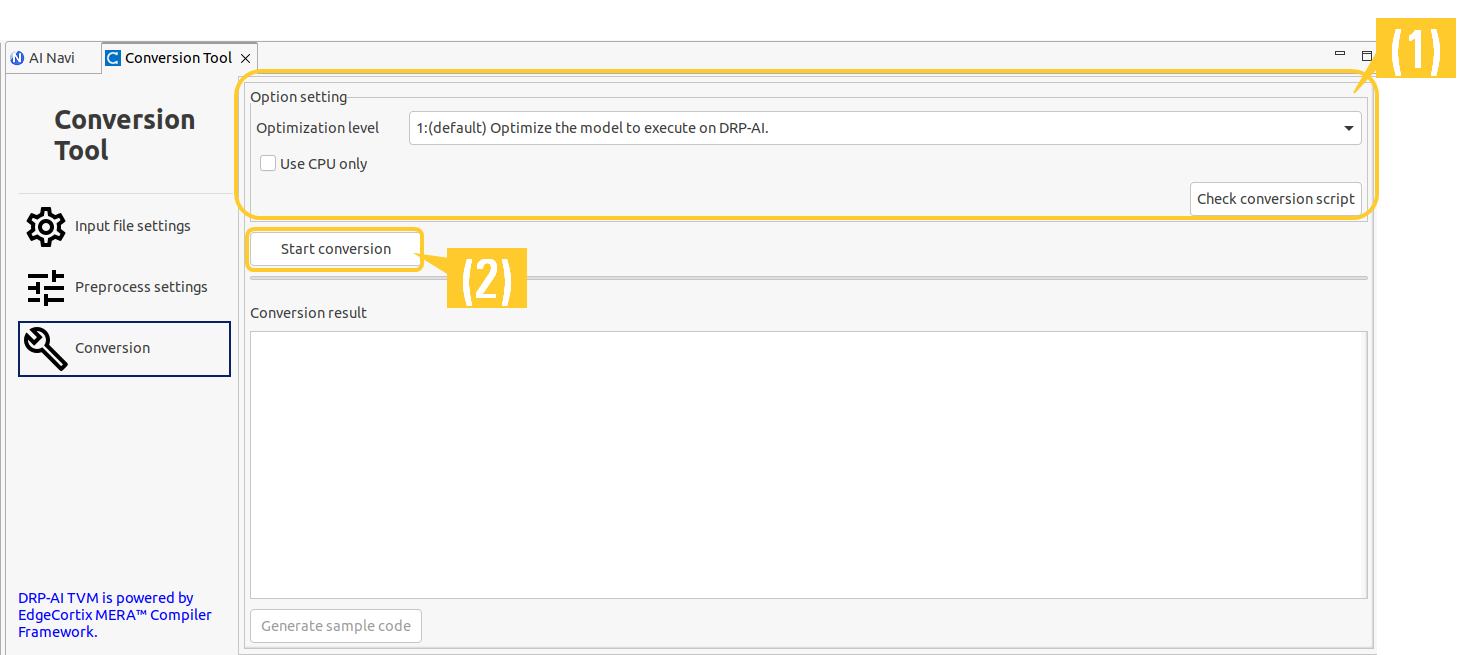
4. AI model conversion
Click the button below that corresponds to your target device and the appropriate conversion procedure will appear.
(1) Configure the option setting.
Select "Optimization level".
If you want to check edit a conversion script here uses this conversion, click [Check conversion script].
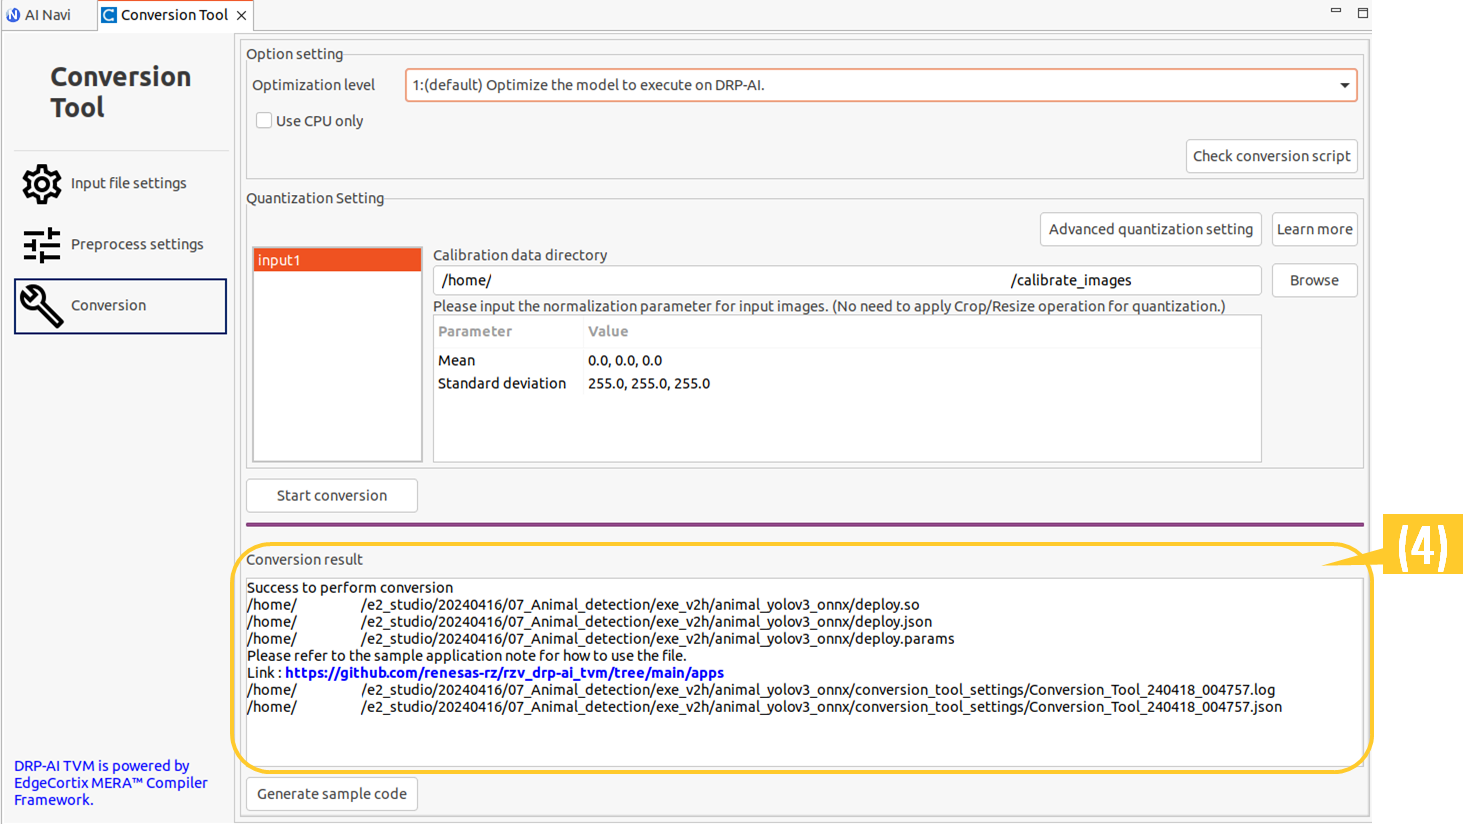
(2)Click [Start conversion] and the conversion process will start. At this time, the console on e2 studio will appear and display logs.

After the conversion is finished, you need to edit and build your AI application.
Click the above button on this page [Option3: Edit Application] and see the procedures.
(1) Configure the option setting.Select "Optimization level".
If you want to check edit a conversion script here uses this conversion, click [Check conversion script].
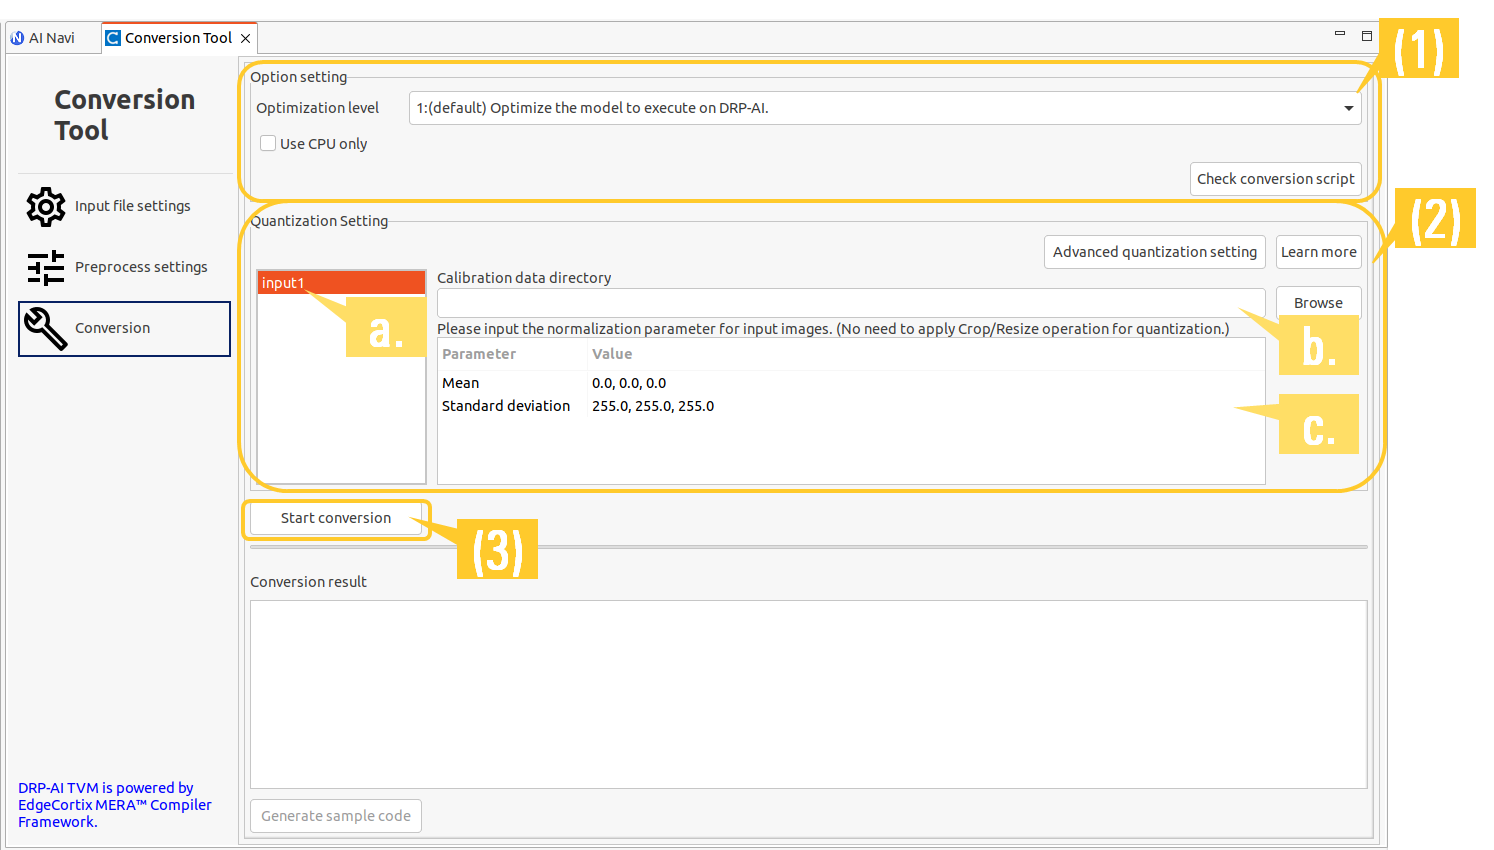
- Select the target input node.
- Specify the calibration data directory containing data to be used during the quantization process.
- The Mean and Standard deviation parameters are already set by default and do not need to be changed.
.jpg .jpeg .png .bmp .gif .tif .tiff .npy
If you want to change these parameters, make sure that the specified parameters match the normalization parameters used during training.
For more details on how to change the Mean and Standard deviation, please see the TVM Plugin Help.(Click [Help]-[Help Contents] - [AI Model Conversion Tool].)
After the conversion is finished, you need to edit and build your AI application.
Click the above button on this page [Option3: Edit Application] and see the procedures.
Option3: Edit Application
You can modify your AI application source codes and build them on e2 studio.Click [Edit Application] on the AI Navigator menu and follow the instructions below.
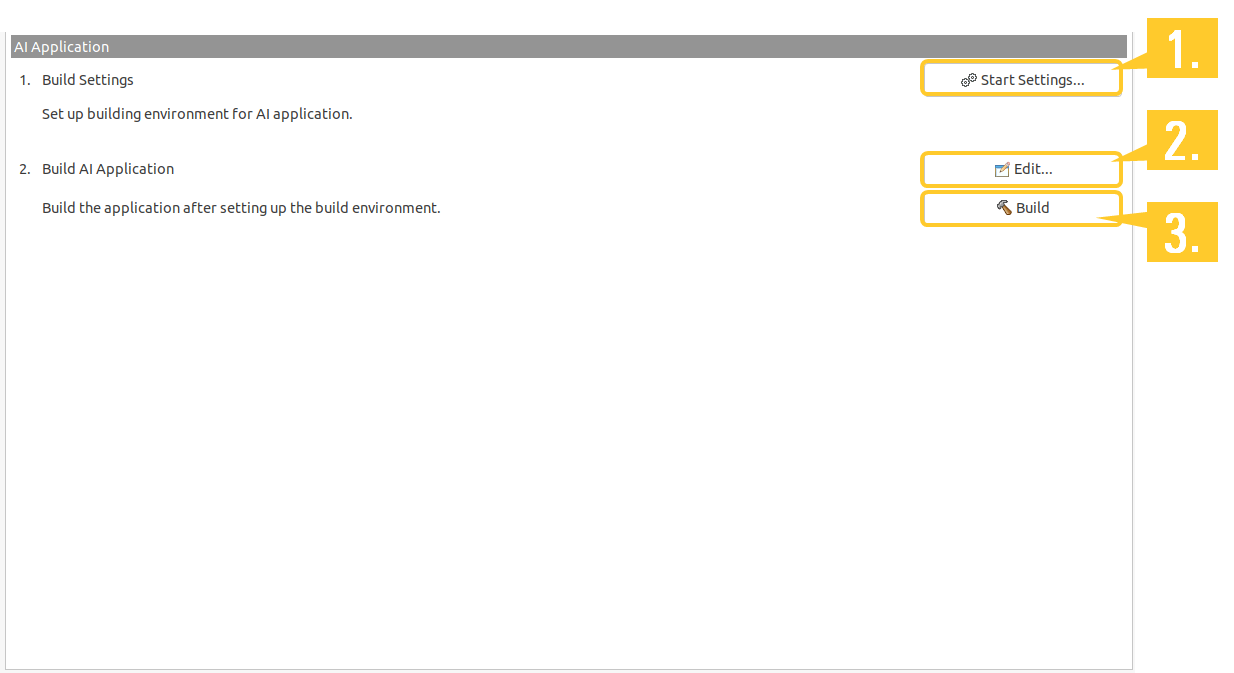
1. Configure the build environment
Click [Start Settings...], and then start configuring the build environment for the AI application.Once the setup process is complete, the appropriate toolchain for the target e2 studio project is automatically registered.
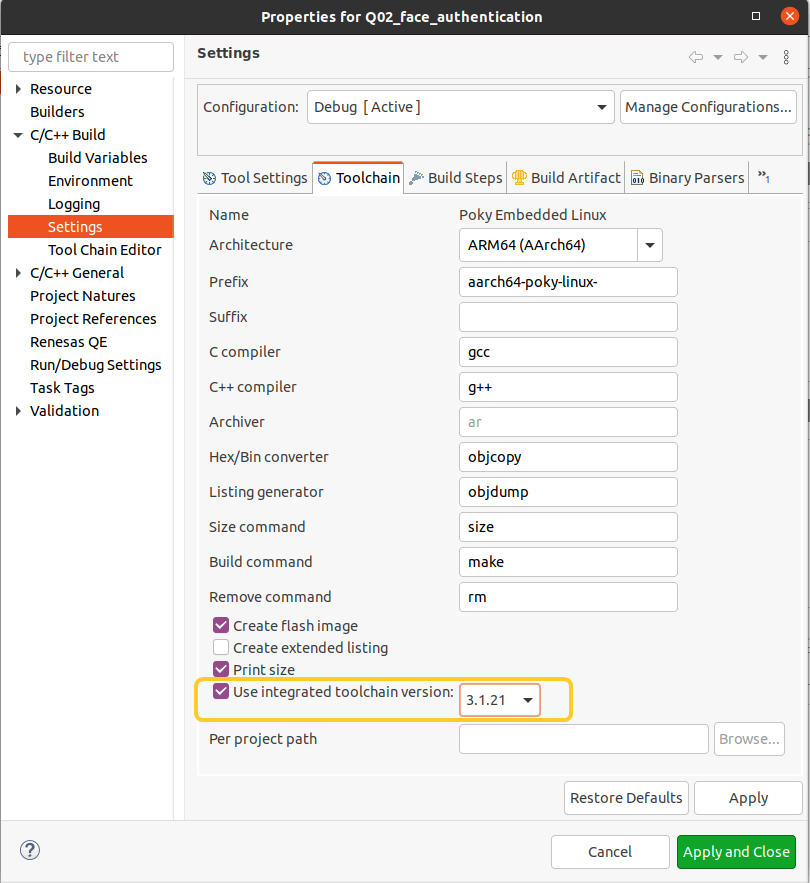
Click [Project] -> [Properties] -> [C/C++ Build] -> [Settings], and click the "Toolchain" tab.
Then, select the toolchain version in "Use integrated tool chain version" as shown in the figure, and click [Apply and Close].
*The toolchain version is (RZ/V2L) 3.1.21, (RZ/V2H) 3.1.26 in AI Navigator 1.1.0.
2. Edit Source codes
Click [Edit...] and edit a source code.If you want to edit another source file, select it in the src directory on the project explorer.
3. Build
Click [Build] and start building. The build result will be shown in the console on the e2 studio.Step 4: Run on the Board
It’s time to run your AI application on the target board.
Click [Run on the Board] on the AI Navigator menu and follow the steps below.
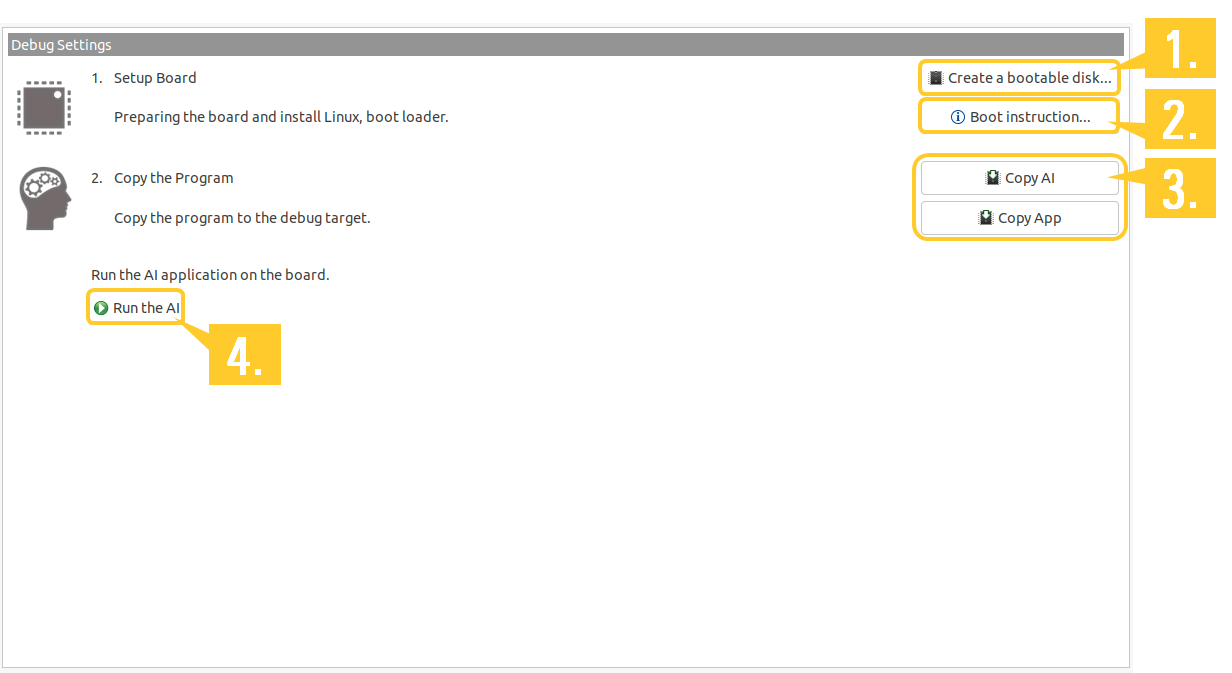
1. Format SD card
Insert your micro SD card into your Linux host PC.
Click on [Create a bootable disk…] and you can automatically format your SD for booting the board.
"bmaptool is required for this setup program. Do you want to install it now?"
If you accept it, type "yes" and the creation process will continue.
2. Boot the board
Start booting the board with the formatted SD card.
If you are not sure how to boot the target board, click on [Boot instruction…] and the instructions for Boot RZ/V2L Evaluation Board Kit or Boot RZ/V2H Evaluation Board Kit will appear.
This may cause the later process (copying AI models and applications, and running the AI application) to fail if you have not configured it.
In addition, if you want to use IP addresses other than those set by default in AI Navigator, please see Settings required when using other IP addresses of target board.
3. Copy AI model and Application to the board
Once the board is configured, you are ready to transfer your AI models and AI applications to the board.
Click [Copy AI] to copy your AI models to the board.
Then, click [Copy App] to copy your AI applications to the board.
4. Run AI application
Click [Run the AI] and start running your AI application on the board.
Also, read "RZV_AI_App_mode_switching_guide_en.pdf" in your imported AI application project. This document describes how to change some configurations when changing the input mode of AI application.
This is the end of AI Navigator Quick Start Guide.
Please refer to AI Navigator Quick Start Guide Appendix for the additional information.