1. Overview
This package is a demo system which can confirm the performances of AI models on RZ/V2H Evaluation Board Kit.
Users can select the AI model applications on the GUI menu by using the USB mouse, without typing any command.
This package supports the following AI models.
- Object Detection
- YOLOv8-S, M, L (Dense model only)
- YOLOv5-S, M, L (Dense model only)
- YOLOX-S (Dense model and 70% sparse model)
- Pose Estimation
- YOLOX-S Pose (Dense model only)
- YOLOX-S + HRNet (70% sparse model + 90% sparse model)
- Classification
- ResNet50 (Dense model and 90% sparse model)
- Depth Estimation
- MiDaS (Dense model only)
- Semantic Segmentation
- TopFormer-Tiny (Dense model only)
Sparse models are created by the pruning tool in DRP-AI extension package, and realize faster performance and lower foot print than Dense model.
2. Package Contents
| Contents | File name | |
|---|---|---|
| SD card image file (WIC format) | USB Camera | rzv2h_ai_performance_demo_usb_camera_sd_image.wic.gz |
| MIPI Camera | rzv2h_ai_performance_demo_mipi_camera_sd_image.wic.gz | |
| License files * | licenses.zip | |
Note: Licence files for the software that composes the above SD card image.
3. Required Hardware
3.1 Target board and peripheral equipment
| Item | Note |
|---|---|
| RZ/V2H Evaluation Board Kit | Hereinafter referred to as the “RZ/V2H EVK” |
| USB PD (100W) + USB Type-C Cable | |
| micro SD Card | Required 8GB or more of the capacity. This package is tested by using SDHC microSD 16GB. |
| MIPI Camera* | e-con Systems e-CAM22_CURZH |
| USB Camera* | Supported resolution: 640x480 Supported format: ‘YUYV’ (YUYV 4:2:2) |
| USB Hub | Only when using a USB camera. |
| HDMI Monitor + HDMI Cable | |
| USB Mouse |
*Select MIPI or USB Camera according to the SD Card Image to be used.
3.2 PC for writing SD Card image
| Item | Note |
|---|---|
| Linux PC | This package is tested on the Linux PC with Ubuntu OS 22.04 |
| micro SD card reader | Required if the Linux PC does NOT equip any micro SD card reader. |
4. How to use this package
4.1. How to write the SD Card Image into the SD Card
- Copy the following files into any directory on the Linux PC.
rzv2h_ai_performance_demo_***_camera_sd_image.wic.gz
- Execute the following command to install
bmap-toolsinto the Linux PC. (If already installed, this step can be skipped.)
$ sudo apt install bmap-tools- Insert the micro SD Card into the micro SD Card reader, and connect the micro SD Card reader to the Linux PC.
- Execute
lsblkcommand, and confirm the device file name of the micro SD Card and the size of it.- In this example below, the device file name of the micro SD Card is
sdalisted on theNAMEcolumn.
- In this example below, the device file name of the micro SD Card is
$ lsblk
NAME        MAJ:MIN RM   SIZE RO TYPE MOUNTPOINT
:
sda           8:0    1  14.2G  0 disk
├─sda1        8:1    1  16.9M  0 part
└─sda2        8:2    1     4G  0 part /mnt/sd
:- If any partition of the micro SD card is mounted on the Linux PC filesystem, please unmount all partition.
- In the example above, the
sda2partition of the micro SD card is mounted on/mnt/sdon the Linux PC file system. You can unmount the partition by executing the following command.
- In the example above, the
$ sudo umount /dev/sda2
or
$ sudo umount /mnt/sd- Write the SD Card image file (
rzv2h_ai_performance_demo_***_camera_sd_image.wic.gz) into the micro SD card by the following command.- The command below writes the SD Card image to the
sdadevice file. Please replacesdawith a device file name displayed on your Linux PC bylsblkcommand.
- The command below writes the SD Card image to the
$ sudo bmaptool copy --nobmap rzv2h_ai_performance_demo_***_camera_sd_image.wic.gz /dev/sdaNote: It will take approximately 5 minutes to write the image file to the SD card.
4.2 How to configure RZ/V2H EVK
First, please prepare RZ/V2H EVK, on which the EXP Board is mounted. Please refer to RZ/V2H Evaluation Board Kit Hardware Manual for more details.
Next, please configure the RZ/V2H EVK and connect the peripheral equipment to it in the order according to the figure below.
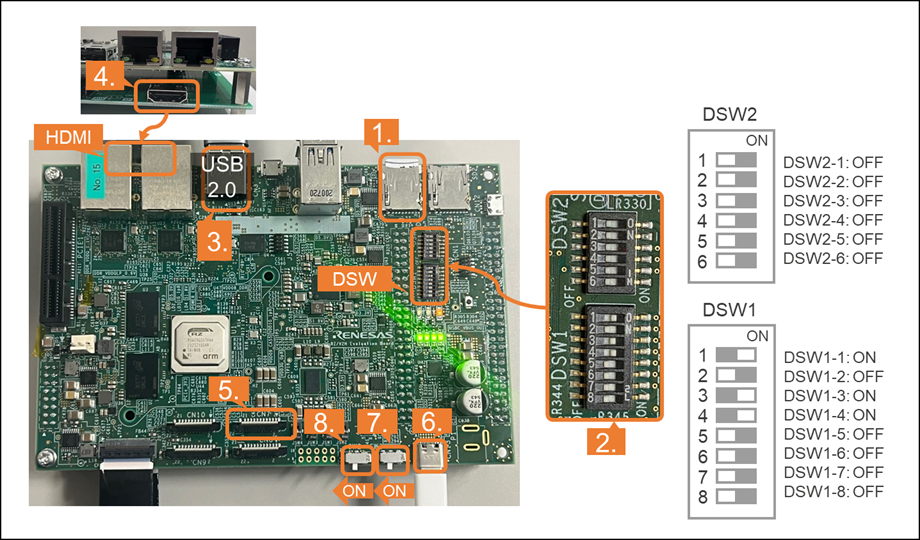
- Insert the micro SD Card to the RZ/V2H EVK.
- Configure the DSW1 and DSW2 according the figure above.
- Connect the USB Mouse (and USB camera via USB hub if using a USB camera) to the USB 2.0 terminal on RZ/V2H EVK.
- Connect the HDMI monitor to the RZ/V2H EVK with HDMI cable.
- If using a MIPI camera, connect the MIPI camera to the RZ/V2H EVK.
- Please connect to CN7 terminal.
- Regarding how to connect the MIPI camera, please refer to the following link.
- Connect the USB PD 100W to the RZ/V2H EVK with USB Type-C cable.
- Turn the SW3 to ON.
- Turn the SW2 to ON to power on the RZ/V2H EVK.
Finally, after waiting for about 10 seconds, GUI menu will be displayed on the HDMI monitor.
4.3 How to start the AI applications on the GUI menu
Users can select and start the AI model applications on the GUI menu by using the USB mouse without typing command.
- Click on the [Start] button of any AI model application to run it, then the AI model application result will be displayed.
- The processing times of AI model the user selected will be displayed at the upper right corner.
- If user clicks to the blue (x) icon at the lower right corner, the application will finish.
- The GUI menu will be displayed again, and user can will select the next AI model application on the GUI menu.
4.4 How to shut down the GUI menu and the RZ/V2H EVK
-
Clicks to the [x] icon at the upper right corner on the GUI menu, then the software will shut down.
-
On the screen, check that shutdown procedure runs and the HDMI display is blacked out.
-
Turn the SW2 to OFF.
-
Turn the SW3 to OFF.
5. Version History
- v1.00 issued on 26th June 2024.
- First version based on RZ/V2H AI SDK v4.00 and DRP-AI TVM 2.3.1.
- v1.10 issued on 29th November 2024.
- Update for RZ/V2H AI SDK v5.00 and DRP-AI TVM v2.4.1.
- v1.20 issued on 6th December 2024
- Update for USB Camera version.
- v1.30 issued on 11th March 2025
- Update for RZ/V2H AI SDK v5.20 and DRP-AI TVM v2.5.0.
- v1.40 issued on 13th January 2026
- Update for RZ/V2H AI SDK v5.20 and DRP-AI TVM v2.6.0.