Set up RZ/V2L Evaluation Board Kit

To boot the RZ/V2L Evaluation Board, follow the two steps below.

Note This guide uses the following environment:
  • Target board:
    RZ/V2L Evaluation Board Kit
  • Boot loader:
    eSD Boot loader, the board boots up using the bootloader written on microSD card.
  • Working directory(${WORK}):
    The directory where the downloaded RZ/V2L AI SDK zip file is expanded. Assume that you have already unzipped to /home/{user}/ai_sdk_work and that you have run "$export WORK=/home/{user}/ai_sdk_work".


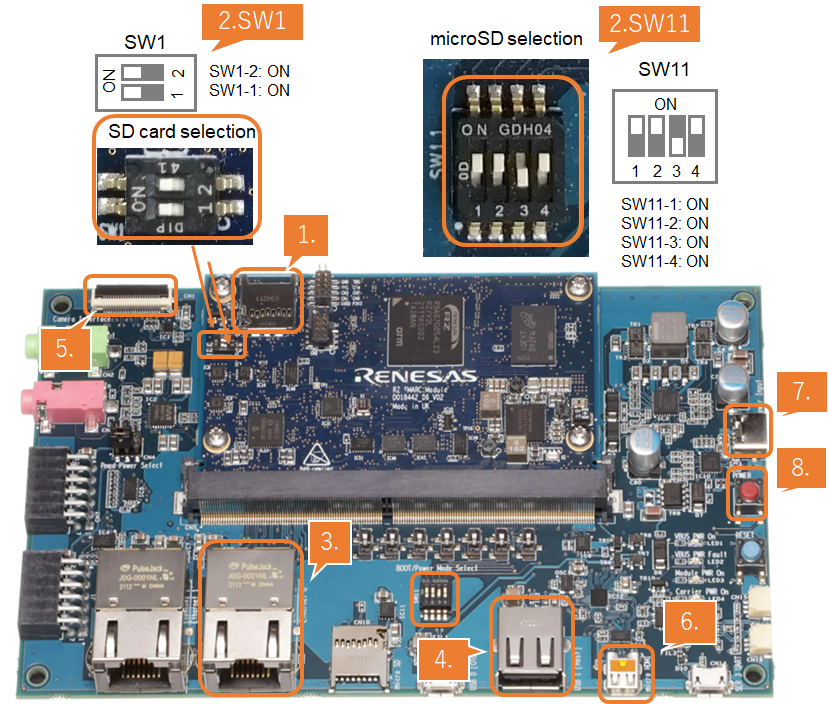
Step 1: Setup RZ/V2L Evaluation Board Kit

You need to prepare a microSD card containing the boot loaders, the Linux kernel, and the root filesystem to boot the board.
You can use a Linux PC to format the microSD card and expand the kernel and the root filesystem using an SD card reader.

Note This step is required only when starting the AI SDK or when using the new version of AI SDK.
If you have already setup the microSD card with the latest boot loader, Linux kernel, Linux device tree file and root filesystem, skip this step and proceed to the next procedure (2. Boot RZ/V2L Evaluation Board Kit).
  1. Format SD card
  2. Create the following partitions on microSD card according to "Format SD card for eSD Boot".

    Type/Number Size Filesystem Contents
    Primary #1 500MB (minimum 128MB) Ext4 Linux kernel
    Device tree
    Primary #2 All remaining Ext4 Root filesystem
  3. Write the Linux files to SD card
  4. At first, run the below command to decompress ${WORK}/board_setup/eSD.zip.
    cd ${WORK}/board_setup
    unzip eSD.zip
    Following three files are necessary, which must be placed on each partitions on microSD card.
    They are in the ${WORK}/board_setup/eSD directory.

    File Description microSD card partition
    Image-smarc-rzv2l.bin Linux kernel image
    (The boot program)
    Partition 1
    Image-r9a07g054l2-smarc.dtb Linux device tree file
    (The configuration file for booting)
    Partition 1
    core-image-weston-smarc-rzv2l.tar.bz2 Linux Root filesystem Partition 2
    Follow the instruction below to prepare the microSD card.
    Warning Here, we use "/dev/sdb" as microSD card device name.
    1. Check if the two partitions are created successfully by running df command.
      df -h
      Filesystem 	Size		Used	Avail	Use %	Mounted on	
      ...		…		…	…	…	…
      /dev/sdb1		…		…	…	…	…	
      /dev/sdb2		…		…	…	…	…	
      Warning Device name of microSD card, /dev/sdb may differ depending on your environment.
    2. Run the following commands to setup the partition 1.
      sudo mkdir -p /mnt/sd
      sudo mount /dev/sdb1 /mnt/sd
      sudo cp $WORK/board_setup/eSD/Image-smarc-rzv2l.bin /mnt/sd
      sudo cp $WORK/board_setup/eSD/Image-r9a07g054l2-smarc.dtb /mnt/sd
      sync
      sudo umount /mnt/sd
      Warning Change /dev/sdb to your microSD card device name.
    3. Run the following commands to setup the partition 2, which is the root filesystem of the board.
      sudo mount /dev/sdb2 /mnt/sd
      sudo tar xfj $WORK/board_setup/eSD/core-image-weston-smarc-rzv2l.tar.bz2 -C /mnt/sd
      sync
      sudo umount /mnt/sd
      Warning Change /dev/sdb to your microSD card device name.
  5. Write the bootloaders to SD card
  6. Before booting up the board, you must write the latest bootloaders to microSD card.
    This procedures needs to be done only once as long as you use the same version of AI SDK.

    There are three files in ${WORK}/board_setup/eSD/bootloader to boot up the board.
    • bl2_bp_esd-smarc-rzv2l_pmic.bin
    • bl2_bp-smarc-rzv2l_pmic.srec
    • fip-smarc-rzv2l_pmic.srec

    Run the following commands to write these files to the microSD card to boot for eSD.
    cd ${WORK}/board_setup/eSD/bootloader
    sudo dd if=bl2_bp_esd-smarc-rzv2l_pmic.bin of=/dev/sdb seek=1 count=1
    sudo dd if=bl2-smarc-rzv2l_pmic.bin of=/dev/sdb seek=8
    sudo dd if=fip-smarc-rzv2l_pmic.bin of=/dev/sdb seek=128
    sync
    Warning Change /dev/sdb, to your microSD card device name.
    Note If you would like to eject the microSD card, please run following command and remove the microSD card from Linux PC.
    sudo eject /dev/sdb
    Warning Change /dev/sdb to your microSD card device name.


Step 2: Boot RZ/V2L Evaluation Board Kit

Once the Setup RZ/V2L Evaluation Board Kit chapter has been completed, you can boot the board in the following way.

  1. Insert the microSD card to the Board.
    Note Use the microSD card slot CN3 as shown in the figure.

  2. Change SW1 and SW11 setting as shown in the figure.

  3. Connect an Ethernet cable between the board and Linux PC.
    Note Use the Ethernet connector Ethernet 0 as shown in the figure.
  4. Connect the USB mouse and USB keyboard via USB hub.

  5. Connect the Google Coral camera to the Board.

  6. Connect the HDMI monitor to the Board.

  7. Connect the power cable to the Board.

  8. Press power button for 1 second to turn on the board.
boot
  1. After the boot-up, following screen will be displayed on HDMI monitor.
wayland
  1. Click the icon at the top-left corner to open the terminal.
wayland
  1. To communicate between your Linux PC and the target board via Ethernet, configure their respective IP addresses.
    • Linux PC:
      This uses the device name of the Ethernet interface "enp2s1" as an example and sets its IP address to 192.168.1.10..
      ifconfig enp2s1 192.168.1.10
    • Target board:
      Use eth0 and set its IP address to 192.168.1.11.
      ifconfig eth0 192.168.1.11