Getting Started
Introduction
This page guides you through getting started with the HMI SDK, including
- preparing your environment (Step 1-3)
- creating SD cards with the prebuilt image (Step 4)
- running the HMI demo applications (Step 5)
Step 1: Obtain an RZ/G EVK
Click the button below to get the target board.
Board and Software
Get the board and software for RZ/G series.
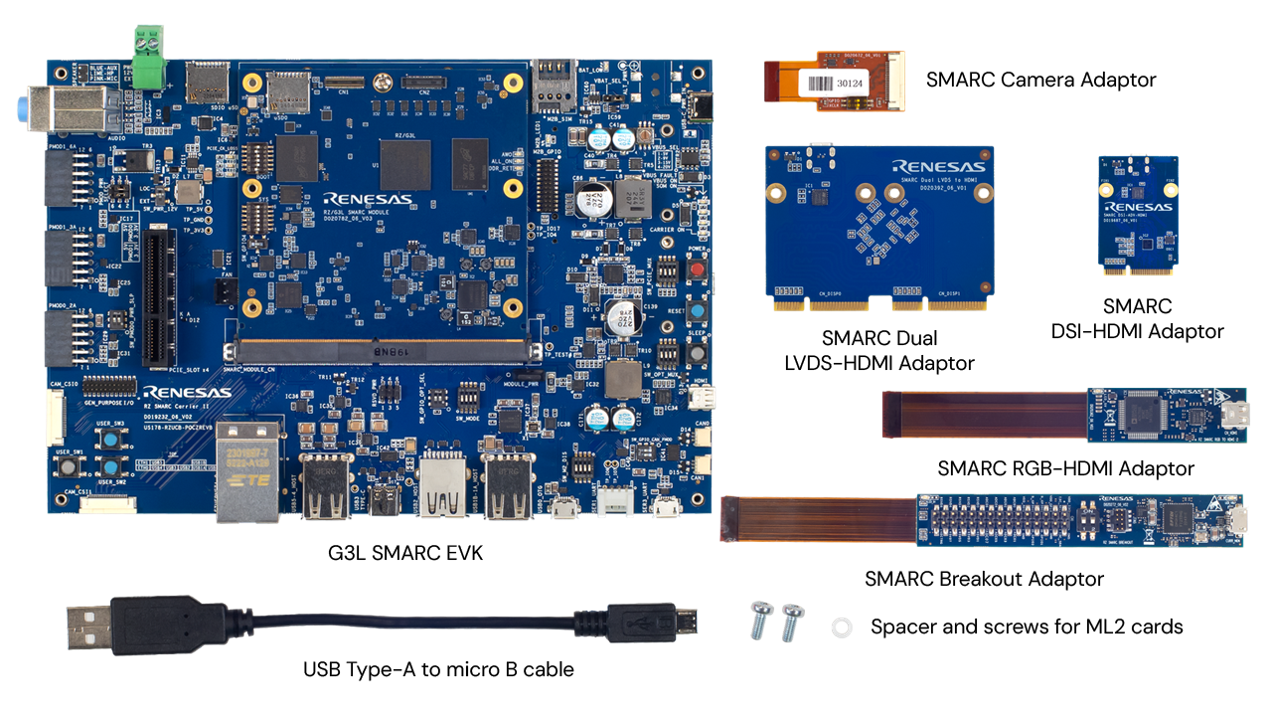
RZ/G3L-EVKIT (P/N: RTK9846L46S01000BE)
This evaluation board kit is ideal for evaluating RZ/G3L. The kit includes the following items:
Contents | Details |
|---|---|
RZ/G3L Module Board (SMARC2.1) | Evaluation board. |
RZ SMARC Series Carrier Board II | |
RZ SMARC Breakout Board | |
RZ SMARC RGB to HDMI Board | |
RZ SMARC Dual LVDS to HDMI Board | |
RZ SMARC MIPI DSI to HDMI Board | |
RZ SMARC Pi Camera Adaptor | |
USB Cable (USB Type-A- Micro USB Type-B) | For serial communication between the PC and the board. |
Note
- Devices with #AC0 or #BC0 in the part number, as well as RZ/G3L EVKIT with Lot # 0000308367 –0000309059 that incorporate these devices, have limitations in the MIPI DSI feature.
- For details, please contact a Renesas Electronics sales representative.
Step 2: Prepare the Necessary Equipment
Please prepare the following required equipment.
Tip
- For details on the required equipment, refer to Necessary Equipment.
- For instructions on how to set up the equipment with your EVK board, refer to EVK Peripheral Setup.
RZ/G EVK
- Target board (Module Board & Common Carrier Board)
- USB Cable (to connect the board and PC via serial)
For Creating SD Cards with the Prebuilt Image
- USB Power PD AC Adapter & USB Type-C PD Cable (to power the board)
- PC (Windows or Linux OS)
- Micro SD Card & Reader (minimum 4GB, 8GB or larger recommended)
For Running the HMI Demo Applications
- HDMI Display & HDMI Cable (to display the demo applications)
- USB Hub (to connect multiple USB devices)
- USB Keyboard & Mouse (to operate the demo applications)
- USB Camera (for video input)
- Audio Speaker (for audio output)
Step 3: Obtain the RZ/G HMI SDK Package
Please download from the HMI SDK Package using the button below.
Note
Refer to File Contents for details about the HMI SDK Package.
Step 4: Create SD Cards with the Prebuilt Image
After downloading the HMI SDK Package, locate the image file.
Target Board | Image File | Location |
|---|---|---|
RZ/G3L | core-image-weston-smarc-rzg3l.rootfs.wic.gz | image-file_rzg3l_hmi-sdk_v3.5.0.1.zip |
Option 1. For Windows PC
- Download or copy the HMI SDK package to your PC.
Unzip the package and extract the image file.
i. Right-click the downloaded package
RTK0EF0195F03501SJ_rzg3l.zip→ Extract All...
ii. Open the folder and right-clickimage-file_rzg3l_hmi-sdk_v3.5.0.1.ziporimage-file_rzg3l_hmi-sdk_lvds_v3.5.0.1.zip→ Extract All...Tip
RZ/G3L supports three display interfaces: MIPI-DSI, Digital Parallel Interface, and Low-Voltage Differential Signaling (LVDS). The HMI SDK package provides SD card images for two of these display interfaces.
In addition, the RZ/G3L-EVK requires the appropriate display connector sub-board for the selected display interface. For information about the EVK, refer to the "Display Interfaces" section in the RZ/G3L SMARC Module Board Manual.
Select one of the following:
- SD card image for eSD boot with MIPI-DSI display support:
image-file_rzg3l_hmi-sdk_v3.5.0.1.zip - SD card image for eSD boot with LVDS display support:
image-file_rzg3l_hmi-sdk_lvds_v3.5.0.1.zip
iii. Inside, you will find the image file:
core-image-weston-smarc-rzg3l.rootfs.wic.gz- SD card image for eSD boot with MIPI-DSI display support:
Flash the image file to your micro SD card using one of the following tools:
Caution
Even if you see a message such as
you need to format the diskbefore/after flashing the image, do not format the SD card.
Option 2. For Linux PC (Ubuntu)
Install the required packages and software.
i. Run the following command to install the required packages.
ii. Run the following command to set up the
gitenvironment if it has not been configured yet.Tip
This step is required only if you plan to continue with further development, such as building sample applications. If you only want to complete Step 5: Run the HMI Demo Applications, you may skip this step.
git config --global user.email "<Your email address>"
git config --global user.name "<Your user name>"
Note
For more information, refer to Yocto Project Quick Build.
Download or copy the HMI SDK package to your PC.
Unzip the package and extract the image file.
Tip
If you are using the GUI of Linux Ubuntu, please refer to the similar steps described in the Option 1. For Windows PC -2.
i. Unzip the HMI SDK package.
Navigate to the directory where the HMI SDK package was installed.
ii. Unzip the image file folder.
Tip
RZ/G3L supports three display interfaces: MIPI-DSI, Digital Parallel Interface, and Low-Voltage Differential Signaling (LVDS). The HMI SDK package provides SD card images for two of these display interfaces.
In addition, the RZ/G3L-EVK requires the appropriate display connector sub-board for the selected display interface. For information about the EVK, refer to the "Display Interfaces" section in the RZ/G3L SMARC Module Board Manual.
Select one of the following:
- SD card image for eSD boot with MIPI-DSI display support: image-file_rzg3l_hmi-sdk_v3.5.0.1.zip
- SD card image for eSD boot with LVDS display support: image-file_rzg3l_hmi-sdk_lvds_v3.5.0.1.zip
Then, unzip the selected file and change to the extracted directory.
For MIPI-DSI:
For LVDS:
iii. Locate the target image file
core-image-weston-smarc-rzg3l.rootfs.wic.gz.core-image-weston-smarc-rzg3l.rootfs.wic.gz core-image-weston-smarc-rzg3l.rootfs.wic.bmap core-image-weston-smarc-rzg3l.rootfs.manifestNotice
- No need to decompress
core-image-weston-smarc-rzg3l.rootfs.wic.gzmanually. - Ensure that the image file
core-image-weston-smarc-rzg3l.rootfs.wic.gzis located in the same directory ascore-image-weston-smarc-rzg3l.rootfs.wic.bmapto flash the image to the SD card successfully.
Insert the micro SD card into your Linux PC and identify its device name and mount points.
Use the
lsblkcommand to check the<device name>and<mount point>as follows:Before inserting the SD card:
NAME MAJ:MIN RM SIZE RO TYPE MOUNTPOINT (snip) nvme0n1 259:0 0 465.8G 0 disk ├─nvme0n1p1 259:1 0 512M 0 part /boot/efi └─nvme0n1p2 259:2 0 465.3G 0 part /- After inserting the SD card:
Tip
The device name is assigned to the SD card by Linux on your Host PC. It typically appears as
/dev/sdx, wherexis a letter representing the physical drive. In this example, the SD card’s device name is/dev/sda, and its mount points are/media/user/bootand/media/user/rootfsUnmount the SD card if it is currently mounted.
Use the
umountcommand with the mount points.In this example:
Flash the image to the SD card using
bmaptool.Use the
bmaptoolcommand with the device name of SD card.Caution
Before running
bmaptool, double-check the<device name>. Make sure the target device (your SD card) is correct and not your system disk. Using the wrong device will overwrite all data on that disk and may render your system unbootable.Caution
The operation below will erase the contents of your SD card.
Step 5: Run the HMI Demo Applications
The HMI SDK supports the following demo applications. Follow the steps below to use them.
- LVGL Home Panel Demo
- Chromium Home Panel Demo
- Flutter Samples
Follow the steps below to use them.
Prepare the necessary equipment and connect it to your EVK board by following the instructions in Hardware Setup.
Set up the DIP switch for eSD boot mode.
Set up DIP switch SW_MODE as follows.
SW_MODE
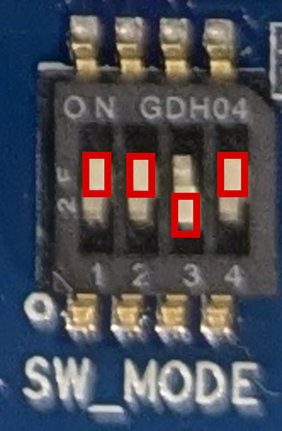
SW_MODE[1] SW_MODE[2] SW_MODE[3] SW_MODE[4] ON ON OFF ON
Insert the bootable microSD card created in Step 4 into the microSD card slot for eSD boot mode, and then power on the EVK board.
Tip
- Please refer to the EVK Peripheral Setup for the location of the microSD card slot.
- Press and hold the power button (red button) for 1 second to turn on the EVK board.
The HMI SDK Demo Launcher starts automatically after the system has fully booted.
After approximately 30 seconds, the HMI SDK Demo Launcher appears.
Click the corresponding button to launch and try each demo application provided by the HMI SDK.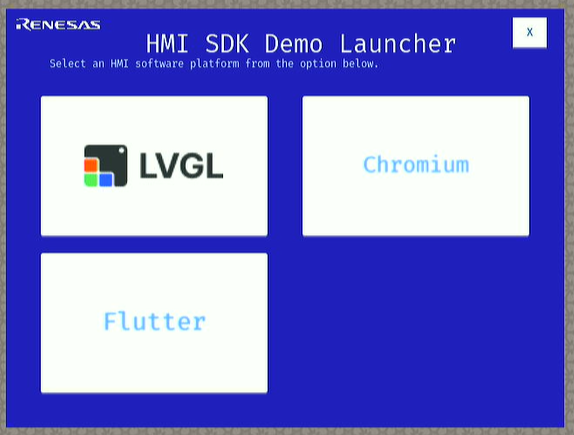
Tip
Please note that the buttons displayed on the Demo Launcher vary depending on the device. For information on the demo applications supported on each device, refer to HMI Application Contents.
Tip
To power off the board, execute the
shutdown -h nowcommand in the terminal. Once the screen turns black, press and hold the power button (red button) for approximately 2 seconds to complete the shutdown process.
This concludes the Getting Started guide.
For detailed information about each demo application, see Demo Applications.
For further development of sample applications, see Sample Applications.
For additional customizations, see Wiki.