Application Notes
Configure IP address for Ethernet
If you want to use the Ethernet for networking, please assign IP address by DHCP protocol. Static IP assignment mechanism is not supported. Since it is necessary to change the framework part to support Static IP assignment, we don't have plans to support static IP mechanism.
Configure display resolution
Booting without video parameter set
By default, HWComposer selects highest resolution (up to Full-HD 1920x1080 60fps)
Booting with video parameter set
1) Power on the device and interrupt autoboot.
2) Execute: editenv bootargs
3) Append to bootargs:
Example:bootargs: androidboot.display.res.HDMI=1280x720@60
4) Execute: saveenv
Remount filesystem
By default, “/system” partition and “/vendor” partition are read-only even if you run “adb remount” command. If you want to access/modify these partitions, please operate as below.
# On Ubuntu Host PC, execute command:
$ adb root              # Access with root
$ adb disable-verity    # Disable verity
$ adb shell reboot      # Reboot your devices
$ adb root              # Access with root
$ adb remount           # Remount filesystem
After remounting, you can access and modify files under “/vendor”, “/system” partition. This step is useful for debugging purpose.
USB Storage / micro SD-Card Usage
To use USB Storage / micro SD-Card on Android GUI, user should format and create partition for USB Storage / micro SD-Card on Ubuntu Host PC beforehand:
Note: before formatting, please confirm carefully /dev/sdX of your Storage devices (by 'lsblk' command)
# Format USB Storage / micro SD-Card

# Plug in USB Storage / micro SD-Card on Ubuntu Host PC, and delete all existed partitions:
$ sudo fdisk /dev/sdX (X = storage devices)
# type ‘d’ and type ‘Enter’                            # Loop until there is no existed partition)
# type ‘w'                                             # Alter changing

# Create new partition (1 partition is OK)
$ sudo fdisk /dev/sdX (X = storage devices)
# type ‘n’ and type ‘Enter’ (4 times)                  # Create new partition
# type ‘w’                                             # Alter changing

# Change partition type
$ sudo fdisk /dev/sdX (X = storage devices)
# type ‘t’ and type ‘c’                                # Format as W95 FAT32 (LBA)
# type ‘w'                                             # Alter changing

# Format partition as FAT32
$ sudo mkfs.vfat /dev/sdX1                             # (X = storage devices; 1 = partition number)

# Plug USB Storage/micro SD-Card on board and use it!
Change SELinux mode
SELinux mode is set "enforcing" mode as default. If you face any failure related to SELinux, try with "permissive" mode permanent by the following procedure.
1) Turn on device and interrupt autoboot.
2) Edit bootargs.
=> editenv bootargs

# Add "androidboot.selinux=permissive" to bootargs as below example.

Example:

bootargs: init_time=xxxxxxxxxx androidboot.selinux=permissive

=> saveenv
If you only want to set SELinux mode temporary to "permissive" mode to run your application, we recommend using below commands:
# On Ubuntu host PC, execute command:
$ adb root
$ adb shell setenforce 0	#Disable SELinux
$ adb shell setenforce 1	#Enable SELinux
Density setting
With different display resolutions, the suitable density value will be set to make display shows properly. Now density is set based on display resolution automatically. But if your display is still not correct (navigation bar may be displayed wrongly). Please adjust “Density value” by executing below commands:
| Display Resolution | Density value (*) | Note |
|---|---|---|
| 640 x 480 (VGA) | 90 | |
| 800 x 600 (SVGA) | 110 | |
| 1024 x 600 | 120 | |
| 1024 x 768 (XGA) | 145 | |
| 1280 x 720 (HD) | 150 | |
| 1280 x 1024 (SXGA) | 200 | |
| 1920 x 1080 (Full-HD) | 200 | Max display resolution of RZ/V2H |
(*) These density values are based on user experiment.
Video format
Only limited range YUV video format is supported.
Optimize boot time
In this release, we provide some tips that help you to reduce the boot time. Please follow the steps below to reduce boot time:
Disable console log (user won’t see console log when booting):
Disable boot animation
Reduce boot delay
Save changes
With the above changes, boot time will be reduced by around 10 seconds.
Note: The command in the box above will be executed on the Board u-boot's console.
Audio sampling rate support
The current kernel only supports 44.1 kHz audio on the RZ/V2H EVK. Audio sample rate conversion may be used if audio sampling rate 48 kHz is used, and audio quality may not be good.
Fastboot UDP
In this release, we provide fastboot UDP which uses UDP protocol to flash Android image. Alternatively, users can run fastboot protocol over Ethernet cable if USB is not available.
By default, fastbootd is supported for fastboot USB. If user wants to use fastboot UDP for flashing Android images, please export USE_FASTBOOTD_FOR_UDP=true then rebuild and re-flash Android images (See Building Android, IPL, U-Boot, and Kernel sources and Flashing images using fastboot).
| No. | Issue/Limitation |
|---|---|
| 1 | Do NOT support “fastboot devices” command. |
| 2 | Fastboot messages are not shown properly. |
Note:
- Fastboot USB does NOT work after enabling fastbootd for fastboot UDP
- Fastboot UDP does NOT work on Ethernet port (CN6).
Enable File-Based Encryption
File-based encryption allows different files to be encrypted with different keys that can be unlocked independently.
By default, we disabled encryption to reduce the booting time. In case that users want to enable encryption support, please export ENABLE_FBE=true, rebuild and re-flash Android images see Building Android, IPL, U-Boot, and Kernel sources and Flashing images using fastboot)
Please note that the booting time with encryption support may rarely take around 1 ~ 3 minutes for encrypt/decrypt data.
Note: File-Based Encryption is disabled by default. All supported features were tested under this configuration
Using SD Card boot
Users can boot Android via SD card. Please follow the steps below to boot Android via SD card:
- Turn off the board. Insert SD card into SD2 slot.
- Power on board and interrupt at u-boot by pressing any key.
- Set boot devices (about mmc_dev, please refer table below):
| Board | Boot device | mmc_dev | soc_suffix | Default mode |
|---|---|---|---|---|
| RZ/V2H EVK | SDCard (SD1) | 0 | soc/15c00000.sd | ✓ |
| RZ/V2H EVK | SDCard (SD2) | 1 | soc/15c10000.sd |
- If SD card (on SD2 slot) does not contain an image, please flash new images by using fastboot (See Flashing images using fastboot).
Note:
- No support external storage on SD1 slot when booting Android image by SD card on SD2 slot.
- The boot time depends on SDCard speed.
- It is required to turn off the board. Then unplug/plug Power Adapter to make sure SD card can be initialized properly.
Support eSD boot
This feature supported fully boot RZ/V2H EVK bootloader and Android userland from eSD (SD1). Users could freely bring SDCard to another board to boot Android. If user wants to use eSD boot, please follow (See Flashing bootloader, Method 2: Flash bootloaders to eSD) and update eSD bootloader by fastboot ( See Flashing images using fastboot, Method 1: Fastboot USB).
Android build options
AOSP 15 supports many lunch combos. Users can freely choose them based on their target. Please refer to below build options:
| Build option | Lunch command | board_name | Note |
|---|---|---|---|
| Minimal | lunch rzv2h_evk_ver1_minimal-ap4a-userdebug | rzv2h_evk_ver1 | No hardware codecs support, less application, no demo applications, no experiment features. Reserved more free memory. |
| Base | lunch rzv2h_evk_ver1-ap4a-userdebug | rzv2h_evk_ver1 | Base environment based on pure AOSP. No demo applications. |
| Demo | lunch rzv2h_evk_ver1_demo-ap4a-userdebug | rzv2h_evk_ver1 | Inherit base build option. But it has some demo applications. |
Note:
- Please update “board_name” based on lunch command before copying Android images (See Building Android, IPL, U-Boot, and Kernel sources)
- This release is fully tested for “Base” build option. Other build options are NOT fully tested yet.
Disabling non-blocking feature in drm_hwcomposer
Open Camera, MX Player and other application does not work properly on RZ/V2H due to timing issue between GPU rendering thread and drm hwcomposer.
By default, disabling non-blocking feature is a workaround to resolve above problems.
User can re-enable it by executing below command:
Experimental features
Flexible Graphics
By default, Mali graphics is used. If users want to use Angle/Mesa (panfrost) graphics, please follow the steps below:
1) Power on the device and interrupt autoboot.
2) Execute the commands below on target board
Switch between Mali/Angle/Mesa (panfrost) Graphics
=> editenv egl
        mali: Booting with Mali Graphics (default)
        mesa: Booting with Mesa (panfrost) Graphics
        angle: Booting with Angle Graphics
=> saveenv
=> boot
This implementation is intended to offer a flexible method for saving time on debugging Graphics issues.
Note: Angle/Mesa graphics are experimental features. Some functionalities are NOT supported yet. It’s only used for feasibility checking.
Enable optional features
Wi-Fi (via TP-LINK Archer T4U AC1200 Wireless Dual Band USB 3.0 Adapter – version 1) and Bluetooth (via USB Bluetooth 5.0 Orico BTA-608) features are supported optionally via USB dongle. So, it’s not enabled by default. If users want to use these features, please "export ENABLE_BT_SUPPORT=true" and "export USE_USB_WIFI=true" then rebuild Android images.
GPU Limitation
Mali G-31 GPU is used on RZ/V2H. It has one single-pixel shader core only. GPU usage may become very high in some use cases. In addition, the display driver supports up to 2 hardware planes. Due to these hardware limitations, high GPU usage may occur and can lead to the following issues:
- Codecs low performance during some video playback scenarios (60fps video playback)
- Flickering/horizontal noise when multiple layers are displayed
Here is an example of “GPU usage (GPU active)” is high when opening multiple applications:
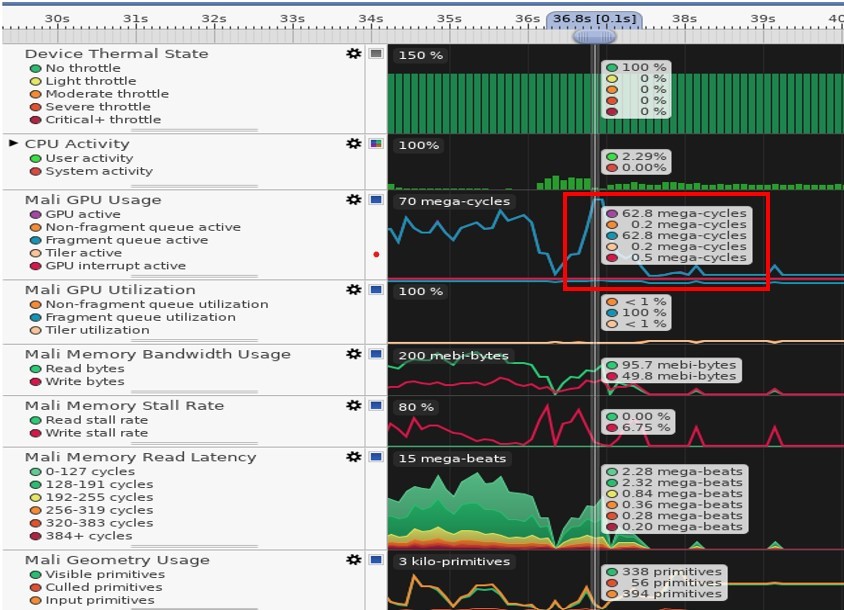
Figure. High GPU usage - captured by Arm Streamline
Codecs low performance
The current hardware does not include a dedicated hardware scaler. Therefore, when playing a video whose resolution is different from the display resolution (For example: Playback 1280x720 video on display resolution 1920x1080), the GPU must be used for handling both:
- video scaling
- layer composition
This additional workload causes high GPU usage and leads to low video playback performance.
To improve performance, the GPU Scaling implementation has been integrated into the C2 HAL. This feature pre-scales the video layer so that it matches with the display resolution prior to composition.
Note: It is enabled by default to improve video playback performance.
Current limitations of current GPU Scaling implementation:
- Low performance may still occur when playing 60 FPS videos.
- The current implementation supports upscaling only. Downscaling is not supported.
How to disable C2 HAL GPU Scaling:
If it’s required to disable the default GPU Scaling feature, please execute the command below via adb shell:
# On host PC, execute command:
$ adb root # userdebug or eng build only
$ adb shell setprop persist.vendor.c2.prescale.enable 0
$ adb shell setprop persist.sys.media.prescale.enable 0
$ adb shell stop media && sleep 1 && adb shell start media
$ adb shell stop vendor-c2-hal-1-0 && sleep 1 && adb shell start vendor-c2-hal-1-0
Flickering/horizontal noise when displaying multiple layers
Flickering or horizontal noise lines may be observed on the screen when displaying multiple layers (Example: opening multiple applications).
The display drivers support a maximum of 2 hardware planes. When 3 or more layers are displayed, the system falls back to GPU composition. The GPU usage may be increased sharply during this transition, leading the following issues:
- screen flickering (disappear after some seconds)
- horizontal noise lines (disappear after some seconds)
Currently, there is no available solution.
How to sign release keys for Android images
When user wants to perform CTS/VTS testing or sign keys for final product, please refer this part to sign keys for Android images.
Note: generate-signed-img.sh script contains some specific information that is related to Renesas. Please update if needed.
Go to your mydroid directory
Copy signed keys script to your mydroid
Export all necessary build variables
Please see more lunch build options at Android build options. Assume that you are signing key for Android “user” build images (build option is “base”), run below commands:
Run below command to sign keys. Input your password or blank for non-password. Press "Enter" to continue.
Confirm any missing APKs or APEXs not signed with new own release keys:
Copy output into image_dir (Building Android, IPL, U-Boot, and Kernel sources). Please export images_dir before copying images
Overwrite with the signed images
Re-flash Android images (Flashing images using fastboot)
Note: Enable USB Debugging in Developer options to use adb
To confirm whether new images are signed keys:
On host PC, bellow command should show release-keys (example: RZ/V2H):
$ adb shell getprop | grep 'ro.build.fingerprint'
[ro.build.fingerprint]:[Renesas/rzv2h_evk_ver1/rzv2h_evk_ver1:15/BP1A.250305.020.T2/eng.khoang:user/releasekeys]
Screen Record issue from Quick Settings
Using the Screen Record application accessed from Quick Settings may lead to a soft reboot on devices running in an FBE (File-Based Encryption) environment. This issue is caused by a poor implementation in the AOSP source code, where processing the output recording file blocks the main UI thread and leads to system instability.
To resolve this, please apply the following patch to handle the processing more efficiently and prevent the device from rebooting unexpectedly during stopping recording, by moving processing recording output to background thread and let UI response immediately.
$ cd ${workspace}/mydroid/frameworks/base
$ git am ${workspace}/additional_patches/0001-frameworks-base-Fix-failed-to-stop-record-by-Screen-.patch
$ cd ${workspace}/mydroid
Note:
- This patch has improved the issue and rarely see it while continuous recording.
- While the recording output is being saved, the system may take longer to launch new applications.
OTA (over-the-air) update
Building full OTA package
Make sure to export build variables which were used to build previous images:
On Host PC, jump to your
mydroiddirectoryExport build variables:
Note: Users should export build variables properly before building OTA packages.
Build OTA package following the command below:
Full OTA package for each board will be located at:
Note: For more detail about building Android images, please read Building Android, IPL, U-Boot, and Kernel sources.
Installing OTA packages
There are 3 methods to update OTA packages:
Method 1) Apply update from ADB:
On Host PC, jump to your
mydroidAccessing to Recovery mode:
Choosing Apply update from ADB on Recovery GUI (using touch screen to swipe UP, DOWN, RIGHT (select) or use a physical keyboard).
Install OTA package:
Waiting for progress 100%. Android screen will show:
Then choose “Reboot system now” on Recovery GUI (skip if used sideload-auto-reboot).
Users need to wait for update engine to complete cleanup process in the first boot after OTA update. If user wants to make sure the update is completed via logcat, the log should be:
Method 2) Apply update from SD card:
Please copy your full OTA package zip file to SD Card
On Host PC, jump to your
mydroidAccessing to Recovery mode:
Choosing Apply update from SD card on Recovery GUI (using touch screen to swipe UP, DOWN, RIGHT (select) or use a physical keyboard). Then choose your full OTA package.
Waiting for progress 100%. Android screen will show:
Then choose “Reboot system now” on Recovery GUI.
Users need to wait for update engine to complete cleanup process in the first boot after OTA update. If user wants to make sure the update is completed via logcat, the log should be:
Method 3) Apply update from SystemUpdaterSample application:
On Host PC, jump to your
mydroidCreating OTA configuration file (Make sure to export build variables before)
Make sure to install the protobuf package (version 3.20.1)
Note: Recommended python3 version: 3.8.10Create OTA configuration file following below command:
OTA configuration file will be located at:
Make sure your Host PC can detect your Android device via adb. Use below commands:
Push the full OTA package and the OTA configuration file to Android device
$ export CONFIG_DIR="/data/user/0/com.example.android.systemupdatersample/files/configs"
$ export FILE_DIR="/data/user/0/com.example.android.systemupdatersample/files"
$ ./out/host/linux-x86/bin/adb root
# Push full OTA package
$ ./out/host/linux-x86/bin/adb push ${workspace}/mydroid/out/target/product/${TARGET_PRODUCT}/${TARGET_PRODUCT}-ota.zip $FILE_DIR/
# Push OTA configuration file
$ ./out/host/linux-x86/bin/adb push ${workspace}/mydroid/${TARGET_PRODUCT}-config.json $CONFIG_DIR/

# In case multiple devices were plugged in PC please provide serial number:
$ ./out/host/linux-x86/bin/adb -s <serialno> root
$ ./out/host/linux-x86/bin/adb push -s <serialno> ${workspace}/mydroid/out/target/product/${TARGET_PRODUCT}/${TARGET_PRODUCT}-ota.zip $FILE_DIR/
$ ./out/host/linux-x86/bin/adb push -s <serialno> ${workspace}/mydroid/${TARGET_PRODUCT}-config.json $CONFIG_DIR/
You can check the input files on Android device manually.
Your OTA configuration file will be located at:
Your OTA package will be located at:Disable SELinux before applying full OTA package
Open SystemUpdaterSample application and click RELOAD button, then application will show up your OTA configuration file. You could re-check your configuration again before going to the next step.
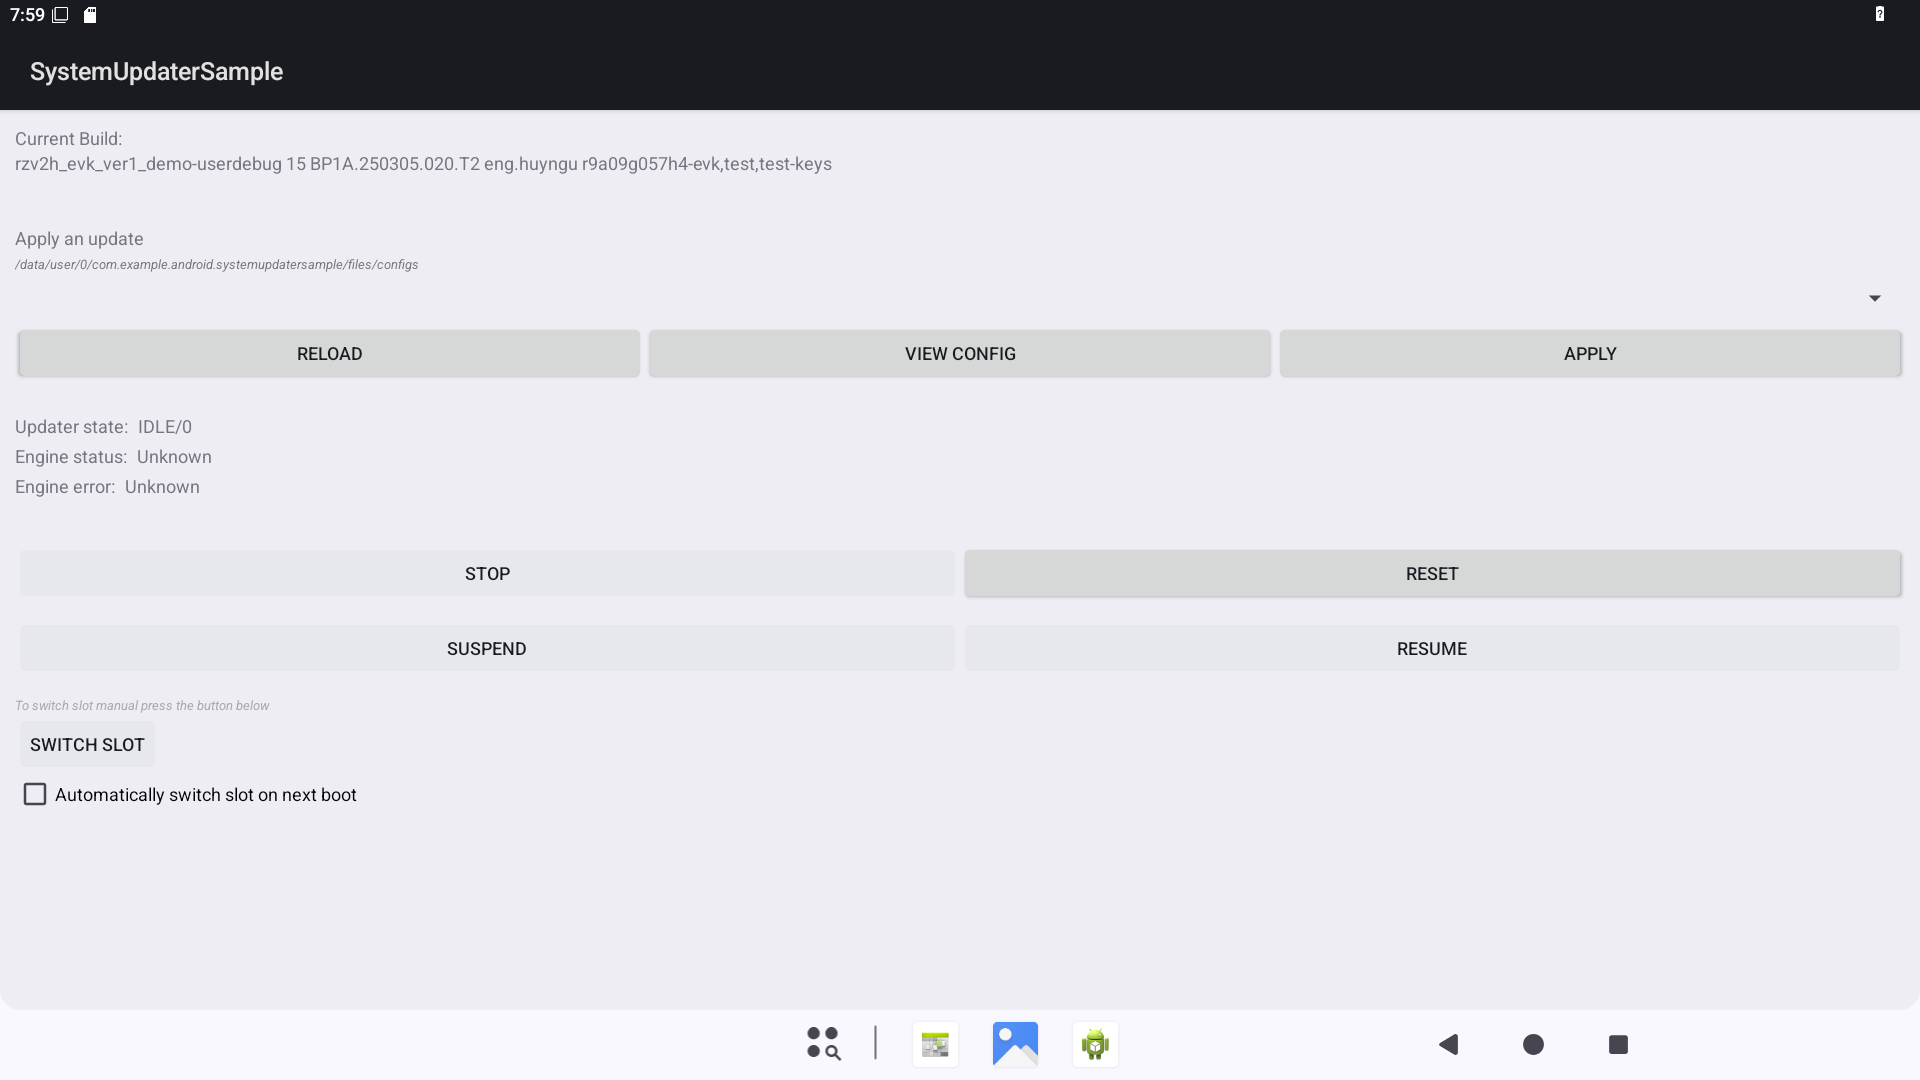
Click APPLY button to start OTA progress update. The logs when the OTA package is installed successfully will look like this:
Note: If you want to switch slot automatically without rebuilding OTA configuration file, you could tickAutomatically switch slot on next bootcheckbox, prior to click APPLY button. This option is not mandatory.Reboot Android device after OTA package was installed successfully.
Users need to wait for update engine to complete cleanup process in the first boot after OTA update. If user wants to make sure the update is completed via logcat, the log should be:
Sample Applications for RZ AOSP BSP
Use these three sample applications to verify and test the functionalities of the RZ AOSP BSP. You can find the source code as Git bundles in our aosp_local_package repository.
Prerequisites: Clone the Repository
To access the bundle files, first clone the aosp_local_package repository:
$ export workdir=`pwd`
$ git clone https://github.com/renesas-rz/aosp_local_package.git
$ cd aosp_local_package/RELFILES/sample_apps/
Summary Table
| Application | Source | Build Method | Purpose |
|---|---|---|---|
| ApiDemos | AOSP (with Renesas RZ bug-fixes) | AOSP Build System | Android APIs tests: Graphics/Camera/General Android APIs |
| Grafika | Grafika (Google) | Android Studio | Codecs/Graphics samples |
| Video Playback sample | Renesas RZ | Android Studio | Video playback sample application with Renesas H264 Hardware Decoder (using Media3 APIs) |
How to Use
To use these applications, you need to unbundle the provided files into a local Git repository. Please follow the specific commands for each application below.
1. ApiDemos
- Commands:
2. Grafika
- Commands:
3. Video Playback Sample
- Commands: